I Unexpectedly Had Surgery - Here's What I Learned About Myself + My Home
My health took an unexpected turn for the worse this summer and it completely caught me off guard, to say the least. Here’s how it went down and what I learned about myself and home in the chaos.
My health took an unexpected turn for the worse this summer and it completely caught me off guard. Here’s how it went down and what I learned about myself and home in the chaos.
The summer started off just as expected, with all the normal summer vibes in full force. I cruised into it with a pause on my business, to focus more intentionally on time with my kids, without the pressure of achievement/deadlines looming (incredibly grateful to adjust my work schedule around their yearly rhythms).
Morning walks, bike rides, park visits, VBS week to spiritually reset, beading fun + classes to learn new skills at my friend Abi’s store - Bead Made Beads, kicking the soccer ball around, meeting up with friends in the early mornings before the heat ramped up, eating our weight in ice pops, watching the cucumbers / tomatoes / herbs / flowers take off in the garden, making pickles, a few soccer camps, swimming / all the water things, loads of trips to the library…you name it, the summer was indeed so GOOD.
Colorful summer beading vibes.
Learning how to make Morse Code bracelets.
I’m purposely leaving out some details here, but come late June, I had some pain in my upper abdomen that I thought was related to a stomach muscle strain. Back in May, I was convinced I had strained something lifting weights. I’m an avid kettle bell person and at the time, I worked them into my early morning work outs 4-5 times a week. So a muscle strain, while coaching two youth soccer teams, was definitely not out of the question. Over the next few months I would have these “muscle flare ups” as a I called them, that felt like an intense stomach cramp. I just had to ride them out until it “released”. I would recline in a chair, sip water, take deep breaths and put a heating pad on it. It would last anywhere from 45 minutes to 6-8hrs +. I only had this experience a few times and assumed this strained muscle had gotten aggravated by something I was doing, so I down shifted all my weights and changed my workout patterns.
Weeks would go by at a time without a hint of any issues. Life felt completely normal. My sleep would improve and things seemed to be healing. Then come July, things started to ramp up again. These “episodes” were becoming more frequent. At one point, I started to rethink what might be going on. I did some research and starting considering the idea that I might have a peptic ulcer that was infected. I started paying attention to the foods I was eating to see if there was any correlation or particular triggers. I stopped eating most dairy, did not take any medications for pain (NSAIDS), avoided spicy or greasy foods and had very little caffeine. We already cook a lot at home so it was easy to navigate avoiding certain foods because I knew what was going into everything I was eating. Surely I could get to the bottom of this with these adjustments.
Our family escaped for a week to the hill country area of Kyle, south of Austin, for several days in the middle of July. When I say escaped, I mean that literally. My husband was also having some health issues as well at the time (I’ll spare you those details) and I was in complete confusion as to what was going on with me. But this week, we all got a break. We took a deep breath. We picked up my parents early on Monday and headed out for the week to rest and relax. It was a wonderful week of being in country isolation, an infinite amount of birds singing, continuous breezes, sunshine, swimming and inspiring architecture. We needed this time so much. We had no clue what was coming next.
Drank my matcha here for the week + listened to the birds all week. Heaven.
The coolest covered salt water pool I ever did see at the Plant at Kyle.
Nature showing off in the Texas hill country.
When we got back, by the end of the weekend, my episodes continued to get worse, regardless of what I was eating. My concern started to grow exponentially. One morning I called my general practitioner just to be evaluated, even though I didn’t have a ton of concrete information to share. This was in the middle /later in July, and even after telling them I was having bad reactions to a suspected stomach ulcer, I still couldn’t get into to see anyone until August 7th, which was almost 3 weeks after my call into the them. It felt like an impossible stretch of time. There was zero sense of urgency.
On July 20th, I had one of the worst “episodes” to date. I had extreme stomach pain that made me throw up on and off for hours on end. It started in the morning when I got up, things leveled out for a few hours, then went right back into it. It was completely debilitating. I couldn’t move, I couldn’t get comfortable. I couldn’t do anything. I couldn’t care for my family. I knew this in no way was sustainable, yet I still had to wait several weeks to get into the doctor. I was extremely worried, concerned, and also trying to get my kids ready to go back to school…can’t stop the mom duties.
After I got through that last round, things leveled out a bit and I had some hope. I had maybe 1-2 minor “episodes” but I was able to work through them and keep going. I wanted my kids to have a great end to summer. I didn’t want whatever was going on with me to get in the way.
Now let’s fast forward a bit to Friday August 1st. I had just spent the previous day in the hospital with my husband while he waited for an MRI and for a procedure to be scheduled (again, going to spare you the details). When I woke up that Friday morning, the pain I experienced was the worst to date (some of the worst in my entire life) and it was all over my abdomen, not just isolated to one spot. I had barely eaten the night before because it was a late night picking up kids staying with family while I was at the hospital, etc. I was suppose to go up to the hospital for my husband to have 2 procedures that day and I couldn’t move…I couldn’t stop throwing up (among other symptoms) and I felt like someone had poured acid inside my body coupled with stabbing pain. Nothing about this was normal. I talked with my father in law (while in the fetal position on the floor of my bathroom) and asked him to take over with Luke at the hospital. I debated calling 911 but I was worried about my kids and where they would go and who would take care of them. I got through an intense wave, texted my mom that I needed her to make the 3 hour drive up to help me, and she did, no questions asked. Thank you God for a mom that cares deeply and will drop anything to help her kids. I am so grateful.
My oldest daughter played “mom” that day and took care of herself and her little sister. She also frequently checked in on me. She made meals for them. She entertained them. She played with her. She read with her. Gosh my kids are amazing. I sat in the recliner in my bedroom all day, trying to sip on water but couldn’t keep anything down. To say I was scared was such an understatement. I felt a huge sigh of relief when my mom arrived that afternoon and I knew my kids would be taken care of for the evening.
The next morning, August 2nd (also my 17th wedding anniversary, HA!), I got up early, scheduled an appointment at a local urgent care for 8am, and dragged myself there. I had no energy, no stamina and very little hope that I was going to get much help. But I had to try. Luke was still in the hospital recovering for his two procedures from the day before. With my mom around to help with my girls, I was free to try to run around and attempt to get myself some help. Once I got to urgent care, we did blood labs and those were sent off. The doctor also gave me a referral for a full abdominal ultrasound for the stomach pain I was experiencing. Between the labs and ultrasound being scheduled, the ball was rolling. I felt like maybe we were getting somewhere. By Monday morning, I was able to get in for the abdominal imaging. I pushed for a rush on the results and thankfully after many conversations with people in person, phone calls and SO much waiting/dropped phone calls (and don’t get me started on that obnoxious hip hop style elevator music I listened to on hold during 90% of my medical phone calls), I started to get some answers.
Somewhere in this mess, my husband came home from the hospital. I assumed some care duties to help him with post surgery healing. It was not glamorous but I did what needed to be done. We kept the ship afloat.
On Tuesday morning, I went back to urgent care for them to give me the imaging and blood panel results because nothing would load virtually in my account like they told me it would (I just love when technology works completely against you in a desperate time).
The guy at the front desk handed me some papers. ‘Extreme cholelithiasis’ is what I read halfway down the top paper in the stack he handed me. I pointed to this term and asked the person at the front desk “what does this mean?” One of the medical techs came over and confirmed the definition on the results and she said to me the words “SEVERE GALLSTONES”.
I cussed out loud (something like HOLY SH**). This is 100% out of character for me by the way. Not an avid cusser by nature. I could NOT believe what I was hearing. I could not have been more caught off guard. I left with my paperwork completely stunned, feeling like I was in an alternate universe.
The next 48 hours were a blur, as I waited for my August 7th appointment (that I had ironically made several weeks ago thinking I had an ulcer). Thursday eventually came, I fasted for my next round of labs, and got a full assessment with all the new information I had brought to my nurse practitioner (the only person I could get in to see) and got an immediate referral for a surgeon. I called them in the car after the appointment.
The first surgeon they referred me to couldn’t see me for a full month. I ask for any other surgeon available, who was also well known in the surgery community, and I was able to get in the next day for a pre-surgery appointment. Done. At the appointment, the surgeon told me I had 2 options - that I could “deal with it” (that I ONLY had 5 gallstones in my gallbladder, HA!) OR have my gallbladder removed (which was recommended based on intensity of my symptoms). Well folks, those “only 5 gallstones” nearly killed me. So the decision was simple. My gallbladder removal surgery was scheduled for the next available slot with my new surgeon on August 19, 2025.
Feeling glamorous getting ready for surgery after an extra 1.5 hour delay.
Week+ post surgery check in. I found new gray hairs. Yay for me! I earned those!
I went on a low/no fat eating regiment to prep my body for surgery and to deter it from any more gallbladder attacks. (I’m still eating in this camp now to let my body adjust to my new normal, a few weeks post surgery).
Fast forward to my surgery day and everything went as planned. Thank you God for this boring, uneventful surgery day! As I type this, I am one day away from my post op appointment and I’m on the mend. I’m easing back into things and my incisions are healing as well expected. These battle scars will leaving a lasting impression on me, that’s for sure. We’re getting on the other side of this mess.
But it’s been SCARY as hell. I will not sugar coat it.
WHAT I LEARNED ABOUT MYSELF
Asking for help can feel deflating and debilitating, yet I had no choice. I let my mother fully step in when I needed her, I allowed my father in law to care for my husband in the hospital when I couldn’t be there, I let me kids do more than their fair share around the house when I couldn’t do much of anything, I let friends take things off my plate daily, I said no to a lot.
I am only 1 person and I have limits. Again, this is not enjoyable to admit. I’ve slowly been swirling around with this idea over the past few years, but it has come to a head the last month. We cannot be “on” all the time, deep rest feels hard, and our health is essential.
I care very deeply for others and try to show up for them loyally as much as I can, so others were willing to do the same for me. I’m so grateful for the friendships and relationships in my life - particularly the people who step up for you apologetically during hard moments, when they aren’t sure how to help, but they still show up. That’s the type of person I want to be.
You’re going to be disappointed by people. Some people know you’re going through a hard time and don’t want to “bother you”, yet their silence of not reaching out is far worse. Also, some people aren’t privy to the knowledge of knowing you’re having a hard time and that makes it clear who you can lean on and who you can’t. Not everyone can be in your inner circle and that’s OK.
Self-serve pantry, all day everyday. Always trying to make it easy for anyone to see everything + grab what’s needed.
Our mantle is visible through most of the home. It’s a place where I’ve tried to create visual cues of calm + cozy.
WHAT I LEARNED ABOUT MY HOME
My home is decluttered and organized enough for other people to take over, keep the ship afloat, find things, make food and also take care of themselves in the home. How do we do this? I’ll circle back to this and break it down in a future blog post.
Minimal cleaning was done (and no one cared about it for good reason) for almost 3 weeks and the house was still easy to maintain and not a total hot mess / laundry, dishes, wiping down the counters sometimes and the occasional sweeping of the floor kept things functional.
My home is set up for other people to easily take over and help. As my kids have gotten older, I’ve constantly redesigned systems and locations of things to allow more independence from them with food, clean up, projects, creating, laundry, etc. They could chip in easily and take on a lot of tasks because the home sets them up for success.
My mother, our extended stay house guest for several weeks before and after my surgery, could settled into our home rhythms and be taken care of and comfortable without much effort from me. Her basics were taken care of - a clean bed, bathroom space, a spot for her clothing, access to laundry if needed, she knew where the french press was to make her morning coffee, food was available and easy to find in the fridge and pantry, etc. The home was not a chaotic obstacle for a house guest. She could assist during a stressful time but still be comfortable.
TAKE AWAYS FOR YOUR OWN LIFE + HOME
Listen to your body, early and often. Don’t spend too much time gathering lots of information so you’re “ready” for a doctors visit. If something feels off, go see someone, even if you have to see several doctors. Just do it.
Fight for yourself always and be your own advocate. The number of times I had to ask more questions and not accept what I was being told was astonishing. Listen. Ask questions. Make the phone calls. Show up in person to keep things moving. It’s worth it.
Ask for help and know you’re worth receiving the help.
Create systems in your home that allow for the ebbs and flows of life’s chaos to keep you and your family grounded and taken care of when inside your home.
Have extremely simple, nourishing foods on hand at all times that take little to no effort to prepare. Oatmeal, potatoes, sweet potatoes, cereal, raw veggies, fruit, eggs, toast, etc. Create a list that works for you and your home so you can stay fed even when you’re not well or just completely exhausted.
Remove physical obstacles in your home that make daily tasks hard to do. Get rid of extra “stuff” that doesn’t help you live well or do your daily home routines easily. These things drain your time and your energy.
Edit ruthlessly. Your thoughts. Your belongings. Your time. Yours spaces.
Sending you lots of love and hugs. Thanks again to everyone who checked in on me. You are wonderful.
See you in the next post.
*big hugs* // Kristin
Improve Your Kitchen in 3 Steps: An Intentional Decluttering Guide
I’ve thought long and hard about what 3 things I can usher you to declutter in your kitchen that will make the MOST immediate impact if you do them. Through rigorous testing lots of methods to streamline kitchen, and through observation of routine patterns/working in many kitchens, I think I’ve nailed it! This 3 part list to declutter in your kitchen below will help you simplify, streamline and improve efficiency quickly throughout your entire space!
Make sure to check out my Ultimate Kitchen + Pantry Guide (inside our All Access Home Bundle) if you want to dig even deeper into this topic of all things kitchen, with strategic steps to follow, without the overwhelm!
KITCHEN DECLUTTER FOCUS #1:
EXPIRED FOOD + FOOD YOU DON’T LIKE HAS TO GO.
You might have expected me to tell you to start by decluttering the ridiculous amount of travel water bottles (and yes, I do want you to do this, but later!!), however I want you to start with one of the easiest things to purge in your kitchen / things that you should have zero emotional investment in - expired goods and foods you’re simply not eating!
DO IT: Set a timer and scan all your food zones for expired items and foods not being eaten.
check the pantry, the things shoved in the back of the fridge,
the condiments in the side of the fridge door
check the freezer for items with freezer burn (or you have no idea how old it is),
toss plastic bags of things that you know are more than months old, etc.
toss spices that no longer smell or taste like they normally should.
while you’re scanning, toss items that are opened that you no longer want to eat or know you won’t eat in the future
donate unopened, non-expired foods to your local food bank / check locally for needs
recycle as much packaging as possible (paper based boxes, metal lids, metal cans, glass jars, plastic bottles - check locally)
Bonus Step for Decluttering Rock Stars: Take note of things you might need to restock on or will no longer buy to avoid future waste and save money!
KITCHEN DECLUTTER FOCUS #2:
EDIT YOUR COUNTERTOPS RIGOROUSLY.
Kitchen countertops are notorious for attracting clutter, which makes it even harder to do basic, daily tasks in your kitchen, like prepping food or making a quick breakfast. To stay on top of this, here’s a few tips to help you edit what’s out on your countertops today, and make your kitchen counters more usable with more space moving forward.
DO IT: Take these steps to start your countertops editing process.
First, put anything away that doesn’t need to be out on the counters - clean dishes, dirty dishes, utensils that can go back in drawers, trash, recycling, toss moldy fruit, etc.
Second, do an appliance edit. Does that blender really have to be out on your countertop or could it get tucked away close to where you like to use it? How often do you use your toaster? If it’s not daily, I’d consider putting it an cabinet close by where you’ll plug it in and only bring it out when you need it.
Lastly, challenge yourself to keep out as little as possible. After the first two rounds of edits, take inventory of all the things still out on your countertops. What do you see? Now assess each item and ask if it is absolutely essential to have out - do you actually use it and is it frequently helpful for you in your kitchen? If yes, could it get tucked away and still be helpful?
Scan for donations as you go. As you’re moving through these steps, you might find items that you simply don’t need anymore, don’t use or don’t like anymore. Have a box or bag handy to put these items in + get them ready to drop off at a donation site locally, or schedule a pick up. Make sure these items are clean, in good working shape and could be immediately helpful in someone else’s home.
Bonus Step for Decluttering Rock Stars: Test having out as little as possible on your kitchen countertops for the next week and see how it goes. If you need to pull something back out because it’s better for your kitchen routines, go for it. But try to see if you can try out something new and see if the extra space benefits you more than things taking up valuable real estate on your countertops.
KITCHEN DECLUTTER FOCUS #3:
DO A KITCHEN ROUTINES EFFICIENCY AUDIT.
The simplest way I can put this is that you’re going to scan your kitchen for inefficiencies that are making you work harder than you need to be. Think about where you use things in your kitchen - do you have things in drawers or cabinets close to where you actually use them?
DO IT: Consider these examples for reference to compare to your own kitchen + let them help you come up with your own inefficiencies to remove! Once you find an efficiency in your kitchen, consider what’s the easiest and simplest way to fix the problem.
If you always chop / prep veggies in one zone of your kitchen, are you chopping knives close by or are you always walking across the kitchen for them?
Do you keep your wood stirring spoons for pots near the stove so they’re easy to grab?
Are your cooking spices within reach of where you cook with them?
Are the breakfast essentials you always use in the morning easy to grab in your pantry or fridge?
Are most of the dishes you unload from the dishwasher put away right right next to or above the dishwasher to minimize time spent on unloading?
Go through and hunt for inefficiencies and see what things you can move around to make routines in your kitchen easier.
Bonus Step for Decluttering Rock Stars: While you hunt for inefficiencies, also consider items being placed in a hierarchy of importance. ‘Always used’ items should be easy to see, easy to grab, eye level and easy to put away. ‘Lesser or sometimes used’ items can be off to the side, up high, down low or towards the back of the drawer, shelf or cabinet. Aim to have as few of these “sometimes” use items. We want our kitchen to mostly hold things we are actively using, all the time, and that make life easier for us in the kitchen!
Now it’s your turn! Try out these 3 steps to help simplify your kitchen and instantly boost how efficiently you can do ALL the food things. Test these out and let me know down in the comments what was most helpful for you!
PS. If you want to dive in even deeper into all things KITCHEN, you’ll want to check out my Ultimate Kitchen + Pantry Guide (inside our All Access Home Bundle) - you’ll find all things decluttering, organizing, space planning, low cost swaps to elevate your kitchen and MORE!
WHAT TO DO NEXT:
+ Check out more KITCHEN TOOLS here!
+ Check out more free resources + all things KITCHEN here on the website for you to benefit from!
+ Dive deeper into all things KITCHEN from decluttering, space planning, organization, design + low cost solutions with refreshes + upgrades inside of our Ultimate Kitchen + Pantry Guide (you can find this inside the All Access Home Bundle).
+ Click the follow button for @fuzzyhipposhop decluttering tips + basics to get you unstuck in your home on instagram!
+ Download my free declutter guide to get you taking quick + easy decluttering action in your own home (linked in profile).
Decluttering Toys In Your Home: A Blueprint
If you’re like the average parent, at least once a day (or 10) we think about kids toys, regardless of the age of the kids. Are they still playing with that? Why does that have so many pieces? Why do they like that thing? Why don’t they play with this? Where in the world are we going to store this? Why did someone give this to my kid? Why is this left out again? Does any of that sound familiar?
Instead of worrying so much about what and our kids may or may not like/play with a toy, we’re going to learn concrete skills to declutter any toys, at any time, while bringing them along for the ride to learn together.
If decluttering toys in your home has felt impossible, overwhelming or just plain confusing, the goal is to take all that away in this blog post. We’ll give you the foundation on how to get started below, and if you want to take it a step further, you can checkout my Parents + Kids Guide To Decluttering!
1. AVOID OVERWHELM BY PICKING A STRATEGY TO MAKE TOY DECLUTTERING FEEL ‘SMALL’.
Instead of getting overwhelmed thinking of ALL the toys in your home + how to declutter them all at one time, make the process feel smaller/more manageable with one of these approaches:
+ Consider a single category to focus on. Games. Building. STEM toys. Stuffed animals. Small toys. Large toys (just a few examples). There’s a lot of ways to slice + dice this but the end goal is to make the process feel ‘small’ + focus your energy on a single group of things rather than everything at once.
+ Pick one toy zone to focus on. A toy drawer or collection. One closet. One shelf. One basket. One bin. One wall of the toy room. Keep hyper focused on assessing one zone, then move on to the next when you can. Declutter toys only in this zone.
+ Set a timer for 10-15 minutes. Pick an area, room or zone to focus on + let the timer guide your process while you declutter. Once the time is up, if you’d like to keep going, feel free to! If you aren’t able to continue, do another short burst of time later when you can.
2. TIPS TO HELP YOU DECLUTTER TOYS QUICKLY.
Now that you’ve decided on an approach to make the process more doable, here’s a strategic list of things to consider/look out for to start pairing down the toys in your home as you’re decluttering.
START WITH TOYS THAT ARE EASY TO PART WITH:
+ Discard broken, beyond repair toys. I would also include cheap, plastic toys in the category from parties (you know exactly what I’m talking about) that break easily /aren’t being actively played with (TOSS). Recycle parts/pieces/packaging whenever possible. Check locally.
+ Donate duplicate toys in good shape (unless both are actively being used). Example: We were recently given a dice game we already had. We donated one of the games.
+ Donate toys that your child active avoids or opening says they don’t like anymore. You can open a conversation about it with your kids by saying: ‘I’ve noticed a few things you aren’t playing with anymore, what are your thoughts about it? Can we donate it + free up more space for other things?’ If something is still up for debate, move the toy/game/etc. in an easy to access location for a period of time you both agree on (1 month for example), then donate if it hasn’t been played with after that time.
GENERAL TIPS FOR ASSESSING ANY TOY IN YOUR HOME:
+ Is the toy actively being used/enjoy frequently? (KEEP)
+ Has your child developmentally outgrown the toy / engage with it less + less? (DONATE, OR save for a younger sibling if you have the space to do so.)
+ Is there a similar toy that your child plays with a lot more? Example: You have 2 similar magnetic tile building sets, only 1 is used when both are out. (DONATE the lesser used one OR try a toy rotation, keeping only 1 out at a time. If one is avoided, it’s now time to DONATE it.)
+ Is it a 90/10 or open ended toy? This means the child has to do 90% of the work for it to be played with, 10% is the toy itself. This toy can be reinvented, redesigned + reused in endless ways. In general, toys with screens, lights, sounds + talks to your kid are not 90/10 toys. Examples of a 90/10 toys include: building blocks, beads, pom poms, a ball, cups/bowls, a marble run kit. (DONATE or limit the number of toys in your home doing all the work for your kids - it will reduce boredom + boost their creativity. Focus on keeping mostly open ended toys in your home.)
+ Are you limited on space in your home / there’s larger toys that your kids don’t enjoy much anymore? Remember that open space to move, create + breathe in are the best things we can offer our kids to foster more play. (DONATE the big, bulky toys that are rarely used eating up valuable space in your home).
See even more tips + strategies inside my Parents + Kids Guide To Decluttering.
3. AFTER YOU’VE PAIRED DOWN YOUR TOYS, MAKE SURE THEY ALL HAVE AN INTENTIONAL HOME.
Maximize the space you have + make ‘play’ more accessible, foster more creativity with your kids, reduce overstimulation + encourage longer, independent play with these strategies:
+ Limit what you have out for your kids to play with, especially 7 + under. Sensory overestimation is at a peak during these ages, so having less out at a time will engage them in more creative play + foster more independence. Children with sensory sensitivities will require additional boundaries per that child. But to recap, no matter the age, less out is always best.
+ Rotate toys around every few weeks if you have the space to do so. If you don’t have space for this, simply rearranging toys in the space you have, swapping bins or displaying things differently one morning can create a similar effect of things feeling new + interesting! You can also consider a toy swap with a fellow mama every few months to refresh your toy stash! I love this idea!
+ Make toys easy to get to / easy to put away. Any toys that need guidance or supervision should be up high/not easily accessible. Model to your kids where things are + where you put them when you’re done playing with them. Model for them how to take care of what they have in their home.
+ Let messes happen. Pick your moments to reset your play spaces + encourage your kids to take charge of this effort. Join in for a bit with some good music on + then let them take over. Remember, the less you own, the less there is to manage + put away!
Now it’s your turn to go try these tips out to help you start getting unstuck with toys in your home, so you can start taking decluttering action in small bursts!! You’ve got this!!
Want more insights on how to talk with your children, tailored to their age, to get them involved with decluttering toys (+ all their things) in your home? You’ll learn all of these tools + more inside my Parents + Kids Guide to Decluttering!
WHAT TO DO NEXT:
+ Download my free declutter guide to get you taking quick + easy decluttering action in your own home (linked in profile).
+ Click the follow button for @fuzzyhipposhop to follow along for more decluttering tips + basics to get you unstuck in your home on instagram!
+ Check out the KIDS STUFF zone for more free resources!
+ A game-changing resource for families: Parents + Kids Guide to Decluttering is a must for any family!!
Sending you + your family lots of fun + less chaos in 2025!!
Please drop any comments + questions below. I’d love to here from you! // Kristin
How To Simplify Your Home Routines When Life Feels Busy (back to school edition)
It’s back to school for many and the shift out of Summer mode is in full swing. When I feel things ramp up, I like to take some time to pause and reflect on how we can keep peace in our home to avoid feeling run over by our schedule shifts.
The feeling of being rushed is the worst. It adds unnecessary anxiety to my kids, myself and everything we’re doing. It just sucks the fun out of life and I’m not here for it.
Today we’re going to brainstorm together a slew of ideas to find extra pockets of time in your day and streamline your home routines during the week to add more ease and peace when life feels busy.
And for the record, use whatever tips work for you and your family. Not all ideas will work for you and that’s OK. Tweak and adjust things to fit your life, your family and your home, deal?! OK, let’s get going.
Observe The Chaos
Before I start listing out a bunch of ideas to save you time and energy during the week, I want you to take moment to reflect on where you saw, felt and were involved in the most chaos during your days this week.
For example, in our home, getting out the door for school can be very dicey. I have two kids that go to school at two different times, yet are somewhat close together. There is very little room for error. I am always looking for ways to make this go smoother and be as stress-free as possible.
Another example is our very full Monday afternoons. We have a chunk of time in between gymnastics and soccer practice where we have to squeeze in a light dinner, which can also get dicey because there is so little time.
Maybe the end of the day is harder for you. Maybe a certain day of the week is particularly challenging. Own it. Write it down. List out on paper or in your phone each of the moments that feel stressful, take too many steps or are just down right not fun. Now we’re getting somewhere. Now we can start talking solutions! You’ll now be able to start aligning your most chaotic times of day in your life and home with some of the ideas listed below that make the most sense for you.
Daily Routine Simplifying + Plan Ahead Ideas:
Eliminate things in your schedule. If it doesn’t have to be done, don’t do it.
Weave in shortcuts throughout your week. Always shopping for the same groceries? Have a standard list and stick to it or automate it with a grocery pick up order.
Know what things might be forgotten ahead of time. If a paper has to be signed last minute (it’s going to happen), locate a pen right in your pack up location so you don’t have to go running through the house looking for a pen last minute. If your kids always need extra ponytail holders, have an extra stash right near the door.
Pre-wash and chop fruits and veggies for the week that can handle it. I don’t do this with raspberries, for example. Cucumber spears, carrots, celery, grapes and some other berries get used to throw into lunches and pulled out for quick dinners all week long. I’ll also do this for apple slices and toss them in lemon juice and they last for days without going brown. This 10 minute effort on Sundays saves countless minutes all week long.
Make most meals extremely predictable and mindless. In fact I want to challenge you to repeat meals week after week. Get creative only when you want to and have the energy for it. For example, our Monday nights now are always grilled cheese with raw veggies and fruit. Wednesdays are salmon, 3 minute jasmine rice and steamed veggies that cook quickly while the salmon cooks. Dinner is done in 10 minutes. Friday nights we elect to grab something out, usually pizza!
Take 5-10 minutes at night to reset a clutter/chaos collector space. This can be a kitchen counter, a kitchen table, part of the living room, the bathroom, anywhere will do. We just have some spots in our home that need to be revisited most days. It’s just reality. But a little light maintenance each day will prevent loads of clutter and overwhelm at the end of the week when you’re just ready to relax.
Meal Plan. I know you don’t want to but it might be the best thing that’s ever happened to you. I have lots of tools for you like the School Meals Idea Planning Sheet or the Groceries and Meal Planning Bundle.
Fill up water bottles the night before (kids, adults, etc.). They’ll be cold for the next day and more time for other things in the morning.
Clear out and pack up bags the night before (or as much as possible). If everything can’t be packed at night, lay out anything else that needs to go in close by to it’s easy to pack the next day.
Lay out shoes near your exit location. We don’t keep all our shoes in our exit location because we are limited on space, but the shoes my girls wear for the next day go right next to their backpacks. No running through the house last minute to find shoes, yes please!
Create outfits that already go together that can be folded or laid out together in a drawer or hung up in the closet. This could work for kids and adults. My kids don’t use this method most days but occasionally plan something out the night before.
Create a personal clothing uniform. This can be easier during certain seasons for sure. Right now I am a cropped linen pants or light joggers and t-shirt girl. It is easy. It is comfortable. It is predictable. It is mindless. If I want to off-road one day I do it.
Add hooks to hang up items to take or reminder notes for the next day. It’s hooks for days over here in this house. I couldn’t go a day without them! From a jacket, to clipping a dollar or return receipt to a hanging basket, or an encouraging note for your child on their way out for school, hooks near your entry/exit areas can help streamline your efforts to remember all the extras.
Cook a meal on the weekend that lots of left overs or is easy to reinvent. One of my favorite weekend meals is chili or pasta with meat sauce. Both of these give us at least 3 dinners during the week. If I want something easy to reinvent, I think about grilled chicken. It can go into pasta, we have it on top of beans with avocado, make tacos or quesadillas, can throw it on a big cobb salad, etc.
Add good music to a mundane task. I’m not sure this will save you time (it might if it makes you do the task faster!) but it will certainly add more joy to your day!
Do a quick reset of your entry/exit zone each week. Remove any non-essentials and clutter that showed up that week. Check out this past blog post helping you do exactly that HERE.
Do a morning routine audit. Frankly, you can do this with any part of your day or your end of day routine (or bedtime routine). Remove any steps that are making the process harder or less enjoyable. More details on how to do this in a past blog post HERE!
Get more sleep and go to bed earlier. Not sure how this will save you time during the day? In a nutshell, everything your brain and body tries to do the next day on more sleep will be easier. Oh, and your overall health will be better for it too! Check out these 7 Surprising Reasons To Get More Sleep to motivate you even more!
Don’t give up precious minutes/hours of your day over to mindless phone scrolling. Recover extra minutes in your day by intentionally using technology and setting healthy boundaries for yourself. If you’d like help with digital decluttering, check out my guide HERE.
Leave out a task list for important items that randomly pop into your head you need to remember. Save yourself brain space and put it in a spot where everyone can see it. Write it down, get it done and most importantly, don’t forget it! See our favorite This Week Printable Planner HERE.
And now I want to here from you!
Drop a comment below of something you love to do during your week to make life easier, save you time, energy and add more peace into your home when life feels busy.
And don’t forget to let me know if any of the tips above were particularly helpful for you in your home!
Organizing Traps: What The Container Store Isn't Telling You
To be clear, I do enjoy shopping in the Container Store (when I need to). The beautiful wall of an incredible array of glass jar options makes my heart go pitter patter. But let’s get real here for a second. What I don’t love are the unnecessary pressures people feel when they go into a store like this (or any store with organizing and storage solutions) and then they end up spending an obscene amount of money on products they don’t actually need. And guess what? Their organizing issues still aren’t solved and they still have clutter making life and daily routines harder than they need to be. Here we’re going to unpack a few organizing traps that are easy to fall into, and what to do instead so you’ll be well on your way to organizing bliss in your home without that hefty price tag. Well…shall we?!
Declutter before you shop.
By the time you step foot into an organizing hot spot like the Container Store, Target or one of my personal favorites, Daiso, you need to declutter the space you’re wanting to add more order to. That’s always step one. This will help you gain clarity on your next steps and what exactly needs more organizing. By the way, none of the stores are going to coach you on how to do this! Here’s a quick checklist of things to make sure you do before you layer in any organization solutions from your favorite stores.
Declutter the zone you’re focusing on thoroughly and ruthlessly.
Remove things that don’t belong in that spot. Toss, recycle, donate, giveaway items as you see fit.
Assess the space you have and identify any organizing challenges you’re having.
Is it a deep shelf? You might need a pull out bin so nothing gets lots in the back.
Do you have a drawer that you need to store a wide variety of items in? You might need to subdivide the drawer with smaller, shallow trays or containers so everything isn’t lumped together and you can see everything you have at a quick glance.
Measure the space you have and sketch a plan for the items you might need to improve that zone with a little as possible organizing product.
Shop your home first.
Shop your home first before you buy a single organizing item. Trust me. Often the best solutions to your organizing dilemmas are already hanging out right there in your home, without you ever leaving the house or spending a dime. Of course the stores won’t tell you this tip!
Look in other rooms, drawers, desks, closets, etc. for organizing items that could solve your current organizing challenges without you leaving the house or spending a dime.
Consider swapping things between rooms that could better fit the zone you’re working on.
Be resourceful with your organizing solutions. Consider boxes, packaging, trays, jars and containers from products/foods already hanging around in your home. Boxes can be cut down and sized to fit drawers.
Plastic fruit containers from the produce area in your grocery store can be cut into two pieces (the lid and the containers base) and great uses as drawer dividers for small items.
They’re also great to corral small office essentials and kids crafting supplies of all kinds.
Price check before you shop.
The reality is that there’s a lot of stores offering similar products to solve the same organizing challenges. Some stores carry different sizes of the same things, some are exactly the same, and others carry a very specific line of product that you can only get there. Before you commit to buying anything, take a few minutes to see what each store has in stock, check the dimensions against what you’re needed, and verify the material(s) used to make the product.
While you’re price checking the items you want to buy, make sure you’re cross checking that with the measurements/quantities you need. A slightly different size might not fit as well in your kitchen drawer, even if you save a few bucks.
Don’t forget overstock stores like Tuesday Morning, Marshalls, TJMaxx and Homegoods (those are just a few of my favorites) for organizing solutions at discounted prices. These stores are best shopped at in person.
Container Store is an excellent stop for highly specific organizing solutions because they’ve thought of every nook and cranny in your home! Depending on what you’re buying, if the cost seems higher, make sure you check the material quality. I’ve never had an issue with quality on items I’ve purchased at Container Store.
Also consider the cost of shipping to your home versus hopping in the car to pick up what you need.
Don’t forget your local thrift stores for organizing solutions. Once you know what you’re looking for, the world is your oyster! Go with a list and measuring tape and see what you can find!
Shop for solutions, not by store labels.
The websites and stores will direct you to the kitchen section for kitchen storage, bathroom area for bathroom storage, etc. This is all fine and well, but, it’s only part of the story! There are so many solutions in every store that could solve your organizing challenges that can be found ALL throughout the store. Here’s a few examples of how I’ve shopped for organizing solutions/products in various shop categories.
I’ve used vertical paper organizers found in the office section for pantry organizing
I love looking in the bathroom section for bins and storage ideas that can go all over the home, like toy storage and pantry containers, especially these Brightroom options from Target with hand cut outs so they’re easy to grab and move around.
The sushi trays, plates and tools from Daiso (shop in store for their full selection) have been my go-tos for organizing shallow drawers in our home because they work just like a tray and are so versatile and wipeable!.
I hope you’ll find these tips handy and inspiring the next time you find yourself needing to add more order and organization to a space in your home. After all, the answers might already be sitting in your home!
If you’d like MORE HELP decluttering, organizing and resetting your home, here’s a few great places to start.
Free Declutter Guide Donate for Good Links + Resources Learn the basics of Decluttering Organizing Basics Shop all Declutter + Organize Guides/Products
Reset Your Home For Summer Checklist
It’s officially Summer according to the calendar (even though it’s been hot here in North Texas for a while now). The focus has shifted to popsicles and hydration now more than ever! With the arrival of Summer comes necessary shifts in our life and home so we can cruise into this next season enjoying what it has to offer. Seasonal transitions are an inherently great time to slow down, reset your home, part ways with anything you don’t want to move forward with in your spaces, and gain clarity on what you’d like in greater focus moving forward.
Do a clothing check in.
1. Take a quick look in your drawers and clothing and remove anything that you KNOW you don’t plan to wear during this warm season. This would include things you avoided last Summer season, items that don’t fit, are uncomfortable, or items you no longer enjoy wearing. If you find anything that you still enjoy wearing that needs to be repaired or altered, put those items aside to repair on your own or take to a local tailor. Here’s our list of donation resources for clothing throughout the US and are often local to your area.
2. Move things around so it’s easier to get dressed during this warmer season. I’m a notorious’ organizing by color only person’ in my closet, but this season I was noticing that I was struggling to dressed easily once the heat started to crank outside, so I decided to move everything around. I grouped all my short sleeves, shorts, skirts, etc. together, organized them by color, then moved these ‘warm weather staples’ so they are the easiest to see in my closet. You can do something similar in your drawers with your warmer weather items. These visual cues focused on the current season for your clothing will help you get dressed with great easier.
3. Pay attention this seasons to items you’re avoiding OR wanting to wear more of. If you notice you’re avoid a particular pair of shorts, start asking questions. Are they uncomfortable? Do they need to be altered? Do they fit right? Are you not sure what to wear them with? Do you need to try them out with other tops or accessories to have more fun with it? Move things you want to wear in a spot that is easy to see. If you have a dress that you’re unsure you want to keep, wear it around the house for the day or on a day you’re running car errands (or quick errand into a store). See how you feel while you take it for a quick “test drive”. Try to mix things up and try out garments you’re not sure about with other things you’ve haven’t worn them. Intentionally shaking things up a bit will likely breathe new life into these pieces you’re unsure about. And if it’s not a match, you can be confident parting ways with these garments after you’d tested them out this season.
Do a food check in.
1. First take a breeze through your fridge and freezer. Look for anything you’re not going to eat, is expired or you simply don’t want anymore. Clean out and recycle and much as possible (please check locally for plastics they accept).
2. Next assess your pantry area. Whether you have an official pantry space or you like to store your room temperature snacks/dry goods/spices/baking ingredients in cabinets, out on a shelf or on top of the fridge, focus on removing anything that is expired, no one is eating or you no longer want to eat. If anything is unopened and not expired, check to see if your local food bank will accept it.
3. Organize and plan for the season. In any area holding food (fridge, freezer, pantry, cabinets, etc.) spend a few minutes group liking items so you’re not digging around all over for the same things. In any kitchen zones that you’re struggling to keep in order, give them a boundary (clear container, basket, tape line on the shelf) to give them a clear home. Label any area necessary so finding things and putting things is easy and intuitive for anyone in the home. Take note of anything you need to restock from your food decluttering session you just completed. Make your life easier with meal planning by creating a list of go-to Summer meals you can put on autopilot for the season. Try our weekly dinner planner notepad here or our Meal Planning Printable Bundle here that will help you plan out your meals with ease for months at a time!
Do a general home check in.
1. Walk the main areas of your home to look for anything out of season, and items that need to be removed or relocated. For example, the winter coats still on the hook in the entryway can be put away for the season. If you’d like to lighten the look in your living a bit, swap out blankets from other rooms to lighter ones during the Summer months. Swap out your kids artwork in frames to ones that feels lighter and brighter. Remove any unnecessary decor, pillows, nick nacks, etc. that make your space feel crowded and cluttered for donations. Recycle old magazines from past seasons. Recycle, file, shred, toss old mail/paper pile that’s been staring at you.
2. Look through your medicine cabinets and toiletries for expired products and items you need to restock. Come Summer, I always get caught off guard with all the products that are essential for our Summer, from bug sprays, aloe, skin care, sunscreens, lotions, etc. Check for expiration dates on all items each year. It’s also important to check in on your first aid kit status and restock on any essentials, including medicines. Check out our TOSS section for proper disposal of products, medicines and common expiration dates for many household items here.
3. Create spaces that encourage you to enjoy your Summer season and support any goals you have. How do we do this? Here’s a few ideas. If you want to read more this Summer, create a reading spot with your favorite books, great reading light, cozy blankets and a spot to put your feet up (you can do the same thing for your kids). If you want to focus on less screen time and more activities in the home, create a puzzle table or game area with card decks/board games so things highly visible and not tucked away. If you’d like to cook more with seasonal ingredients while they’re the freshest, display fresh products in a beautiful way in your kitchen and plan out some meals that highlight your seasonal food favorites (see our everyday meals planner and our meal ideas list maker here).
I hope these tips will help you take a quick look at your home with fresh eyes, lighten your load in your home, and help you focus on more of the things that you enjoy about this Summer season.
If you’d like MORE HELP decluttering, organizing and resetting your home this Summer, here’s a few great places to start.
Free Declutter Guide, Learn the basics of Decluttering, Schedule Decluttering Support, Donate Your Decluttered Items For Good Links SHOP all Declutter + Organize Guides/Courses
How To Declutter All The Kids Stuff at the End of the School Year
It’s no secret that when school is out (and in the weeks leading up to it) your home can be inundated with papers, artwork, supplies, and random objects far beyond what your home can handle. Today we’re going to break down each category of kids’ school clutter, how to declutter them, then what to do with what you want to keep. And yes, we’re going to discuss how to work with your kids to get them involved in the process so it’s not all on your shoulders! Yep, I’ve got you!
School Papers + School Work.
EDIT: Go through any school papers that came home with your child or have them go through it on their own. My now 8-year-old does this completely on her own. I like to quickly glance through the stack before to scan what’s been going on in her world, then I let her take over the process. Take a few minutes to marvel with them in the stories they wrote, the assignments that were particularly challenging, or things they enjoyed the most. If it feels daunting, set a timer for 10 minutes to keep things moving.
RECYCLE: Anything that doesn’t want to be kept and is paper-based without tape or glue can be recycled.
KEEP: If there are papers you or your child wants to keep, assign them to a folder for a while (ie. give it a clear boundary with a home your child can manage). Revisit this folder in a few months to see if these keep items still need to be kept (often they are ready to part with them sooner than you’d think).
Kids Artwork.
EDIT: Go through the art pieces with your kids or have them go through it on their own. I love having them tell me about their favorites and how each was created. Pull aside the favorites they want to keep and set aside the ones they’re ready to move on from.
RECYCLE: Art made from tapeless origami or watercolors, crayons, colored pencils, and/or markers on paper can all be recycled when no longer wanted. If a piece of artwork has paint, stickers, glue, googly eyes, glitter, popsicle sticks and feathers, it should go in the trash. Are there plastic pieces? Foam stickers? These are all things that cannot be recycled, and shouldn't be placed in the recycling bin even if they are attached to paper or cardboard. See addition kids art recycle and toss tips HERE.
KEEP: Artwork that your child wants to keep can be saved in a few ways. 1) Displayed in the home in frames or pinned up in any way you choose. We rotate out artwork each season or every few months n frames on an art ledge. 2). Have a keep folder (like the papers) to save for a while and revisit later. 3) Make it into something else, like a card for a friend’s birthday or gift wrap for a grandparent. 4) Take digital photos of their favorite art pieces and create a printed photo books each school year, semester, or whatever timeframe works best for you. I love how Holly Blakey creates art books for her kids using this technique. Alison Mazurek also has the best space saving suggestions related to kids artwork and saving here. I hope to get more diligent with this in our own home, so I’ll keep you posted on my progress soon!
School Supplies.
EDIT: Before you start chunking things in the trash, look at all that has come home with the filter of “could we use this again next year or someone else?” Over the last several years, we’ve been able to reuse several things from year to year. From backpacks, lunch bags, notebooks, plastic folders, dividers, to pencil cases, crayons, colored pencils, pencils, some unused notebooks, pens, erasers, etc. All the sudden your bill for school supplies next year doesn’t seem so high!
RECYCLE: Extra paper boxes and bulky packaging that’s no longer needed can be recycled so they don’t take up as much space. Reuse or donate anything in good shape that is no longer needed or you have duplicates of, from books, to writing utensils, extra paper, notebooks, rulers, etc. Full notebooks that have been used up as journals or for notes can be recycled if they are without tapes, glues, stickers, etc. These extras can also be offered up to local schools and charities to support teachers and students with school supplies needs. Check out all my donation links under schools and teachers here for more ideas.
KEEP: If you have school supplies you anticipate using again for next year, I would encourage you to pull them aside in a bag or container and label it. One of my age old tricks is to remove any permanent marker from notebooks and plastic folders with a damp Mr. Clean Magic Eraser. If you’re trying to remove any labels or stickers on most plastics or non-paper surfaces, it will easily come off with some drops of lemon oil rubbed on it for a few minutes. Wipe the area clean with water and dry off completely once the label or sticker has been removed.
Random Toys + Misc Objects.
EDIT: Before you start editing, talk together with your kids about where these fun “extras” are going to live in your home. Give them a clear boundary or two so they have a home for the toys/extras so can be easily returned there. Pull everything out onto a table or flat surface to go through it. Identify what’s trash, recycle, donate and keep items. Discuss limiting duplicates, things that broken or no longer loved. With a clean boundary (like a basket or a drawer) it will be clear how much can be kept moving forward.
RECYCLE: Paper-based items, cards, boxes, notes, etc. can make their way to recycling if they’re not longer being kept. Check on what plastics your area accepts locally. Consider toys in good shape that could be given away/donated/sold and pull those aside for donations. If it is a cheap plastic toy that will break in two seconds, it’s best to send it directly into the trash. You can also offer up a box of toys or kids decor freebies to a local Buy Nothing Group or share to your area on Freecycle for others to enjoy.
KEEP: With the newly establish boundary for your child’s random keep items, help them organize what they have and discuss how to filter what comes into your home in the future. For example, group items by sizes and how it is used/by type for example. Ask them questions about what they enjoy playing with or what they enjoy having around the most to help them focus on what they should allow into the home in the future. This editing and organizing process will also give them clarity on what they already own. Discuss that once this “boundary” is full or feeling disorganized (they’re digging around, can’t find things or the drawer won’t shut for example) it’s a red flag to take some time to go through and edit what’s in there. They can ask for your help or go through it on their own. Practice over time will make this process easier and smoother, promise!
Are there any other kids “school clutter” that I missed or you want me to talk more about? Make sure to drop it down below in the comments. Now tell me, have you tamed the school clutter yet in your home this summer? Tell me everything in the comments below!
Want to get this decluttering party with your kids + need more help getting started? Here’s a few options for you to get you moving + motivated.
Parents + Kids Guide to Decluttering
The biggest game changer to make decluttering in your home with a family less chaotic + more peaceful!
Free Declutter Guide, Learn the basics of Decluttering, Schedule Decluttering Support, Donate Your Decluttered Items For Good Links
Zero Dollar Spring Wardrobe Refresh Tips
Whenever I hear zero dollar tips, my ears perk up…you too? Today we’re going to focus on your Spring wardrobe and how you can refresh what you already have in your closet and drawers. These Spring wardrobe tips will help you more creatively and resourcefully get dressed with more ease, more options, and without spending money. Shall we?!
You decide what feels Spring for you. Truth be told, most of my wardrobe crosses over most seasonal boundaries. Over the years I’ve found that I do like having a few pieces that pull me out of the dark, cold winter months to perk up my mood and my mindset. I suggest you have a few of those pieces to boost your spirits too.
Assess what you have.
First I want you to take a thorough look at your clothing and accessories currently in your home. Getting reacquainted with what you have in your closet (or things you haven’t worn in a while) will give you clarity on what you own in your closet/drawers/etc. If you haven’t decluttered/edited your clothing and accessories in a while, head to my last post on simple tips to Declutter Your Wardrobe for Spring. After a light edit and survey of what you have you’ll be ready to rock!
Move things around.
One of my top tips for breathing new life into any space, including your closet/drawers, is to move things around. But not just move things around randomly, move things strategically around a specific goal (in this case, showcasing your Spring or warmer weather favorites). For example, as we shift into this next month, you’ll want to intentionally move Spring-focused garments/pieces in a spot that is front, center and easy to see. Now take a moment to look at your current closet space. Let’s say you organize your closet by garment type (pants, shorts, blouses, short sleeve, long sleeves, sweaters, scarves, etc.). To shift it for Spring, you’re going to reorganize what’s in each section from Spring back to Winter. For many of us, this looks like lighter/brighter colors on the left and then moving gradually to darker pieces over to the right. This alone will help you get visual cues for Spring all throughout your closet and give you a fresh perspective on your clothing. You can use this same idea for your drawers with folded up tshirts, pants, shorts, etc. And don’t forget to keep those essential basics (favorite pants, joggers, jeans, tops, layering pieces, etc.) in a spot that is easy to get to, as they create the foundation for any season you move into.
Scarves, bandanas and hair accessories are my secret weapon when shifting between seasons. Scarves/bandanas can be worn around your neck in a variety of ways, almost like a necklace, or in your hair like a headband or wrap. They are a limitless resource to take an outfit that feels heavy/wintery into a lighter Spring style.
Leverage accessories.
Regardless of the type of accessories you have or collect, these are essential pieces that can help shift your wardrobe into Spring (or any season). Some of my personal favorites are light weight scarves/bandanas (in my hair, around my neck a few different ways), jewelry (I like to pull out some of my bigger/lighter earrings for example), and changing up my lip color (yes I do consider that an accessory). My scarves/bandanas are my secret weapon helping me feel endlessly creative when updating my wardrobe. I have some vintage ones I’ve collected over the year from estate sales/thrifting, a few favorites from Madewell, and of course the hippo bandana I designed for the shop. Other items to consider are belts (love adding more color with thinner belts or lighter woven ones), shoes, jewelry, nail polish color, bags, hair accessories and hats. I’m sure I’m missing something but you’re catching my drift. There’s so many items you likely already have in your wardrobe that can help shift your style into a lighter Spring vibe.
Get creative.
Do “Spring” however you want. You can google spring style trends like I did here. You can also ignore all of them (common for me). You can scope out some ideas on Pinterest and throw together a Spring style board to give you ideas for outfit combos you’d like to try out from things already in your own wardrobe (I love to do this for all seasons when I get bored getting dressed). As I discussed in my last blog post about decluttering your wardrobe for Spring you can walk through your favorite stores or visually shop online for outfit/clothing Spring ideas without ever buying a thing. If you can do this for decor in your home, you absolutely can do this to inject some inspiration into your Spring wardrobe! Take pictures, save images of your favorites and challenge yourself to try out some new combinations and have more fun getting dressed.
Pay attention.
As you move through this Spring seasons, I want you to pay particular attention to a few things. One, what are your favorite go-tos that you feel like you can wear endlessly over and over again? These are your Spring essentials that help make everyday life easy! Two, what pieces are you avoiding? Are they still around after a light edit but you’re still not wearing them? To bring them into more focus, move them to a highly visible spot in the front of your closet or out on a hook so you give more attention to them. Wear them in your home for half a day and see how you feel in them. Give them a test run out for a few errands. Living life in these pieces that you’re on the fence about will give you an answer if they should stay or go. Sometime trying on a garment with pieces you’ve never worn them with before breathes new life into them and you fall back in love with it. Mix it up. Test things out. Edit as you go if needed.
Just remember as we move into this Spring season and warmer weather, make sure to check back in with your closet, drawers and accessories to gain clarity on what you already have. Just like you need to shop your pantry before you create a grocery list, you need to do the same thing with your wardrobe. Often breathing new life into your ‘getting dressed routine’ is as simple is putting fresh eyes on things you already have.
Want more support decluttering your clothing closet/wardrobe for Spring + beyond?
Clothing Closet Declutter Guide
Learn the basics of Decluttering
Let me know how I can support you in your home.
Drop your comments below. Thanks for being here!
Declutter Your Wardrobe + Accessories For Spring
Attention!!! I am NOT going to tell you to toss or donate the bulk of your wardrobe and start fresh for Spring! Nope! Instead we’re going to declutter your wardrobe and accessories for Spring from a lighter, more resourceful approach. Together we’ll walk through how to quickly edit your wardrobe and dress so it’s more effortless, some easy steps to make better sense of the closet space/drawers you have to store everything more efficiently, and become more resourceful with the clothing you already have. Are you in?! Good. Let’s get started.
I’ve discovered over the years that getting dressed is the easiest for me + my brain when my closet + drawers are organized by color. Take some time to figure out what organizational style works best for you so getting dressed feels as effortless as possible.
1. Clarify how you like to get dressed.
Probably not the first question you thought I was going to ask you! For example, I love getting dressed by color. 95% of the days throughout the year, color drives my initial choices of how I get dressed, followed by what the weather/activities for the day are steering. This might look a little different for you. Take some time to think through how you like to get dressed and what feels most intuitive for you. Is it pure function? Is it based on patterns you like to wear? Do you prefer to have a uniform of sorts (you love wide-legged trousers and a fun blouse for work most days)? It’s OK to have a combo of these on different days of the week or 2-3 primary ways you enjoy getting dressed. Get in tune with this so you can better organize your closet space to support what works best for you (see future steps).
Bonus Tips:
If you’re not quite sure about how to do this, I suggest you observe how you get dressed for the next week. What make getting dressed feel easy? What makes it feel challenging or frustrating? What order do you like to get dressed in with each garment? What color or colors do you gravitate towards? Did you always pull out extra layers to pair with basics? How do you dress differently on certain days or times of day? These are just a few different ways you can document how you naturally get dressed to help steer how you’ll edit and organize your closet/drawers in the next steps.
2. Do a light, strategic edit.
In this Spring wardrobe and accessories decluttering round, I only want you to focus on these 3 things:
Remove Spring/Summer items you haven’t worn in the last few years - including items you’ve fallen out of love with or have been avoiding for a while, don’t fit well or are uncomfortable
Remove items that don’t align with how you want to dress in your real day to day life (ie. the observations you uncovered in the step 1)
Remove accessories, outerwear, shoes, etc. that haven’t seen the light of day in years - if you do uncover something you forgot about that you love, let’s move it somewhere prominent so it can be enjoyed (see step 3)
Bonus Tips:
After you do this light edit, make sure to prepare items that can be resold or worn again for donations. Wash, clean, fold and organize items by type to help whoever receives your items get them in the right hands quickly. Donate items in recyclable paper bags, boxes or reusable bags to reduce waste during the process. Items beyond repair or can’t be resold can be sent for textile recycling. Check out more resources here.
3. Move things around to dress for the new season.
One of the bonus benefits of doing a wardrobe decluttering is a greater awareness of exactly what you own. Having this mental clarity is incredibly powerful! It helps you become more creative with what you already own and keeps you from running out to buy new pieces. Keep these next tips in mind while reorganizing your closet/drawers for this new season.
Group hanging items by how you like to get dressed (example by color, by garment type, by pattern, by occasion/activity, or a combo of any of these - use your insights from step 1)
Move things in a spot that you want to wear in a prominent place, like on a highly visible wall hook, in the front of the group of blouses, on the top or in the front of a folded stack - think about how a store would merchandise their goods for maximum beauty and visibility when highlighting these items
Clothing you’re keeping that’s for a different season/weather can move out of the prime real estate spots of your drawers and closet space (think back of drawers, up high, tucked away, in a container under the bed, in the back of the closet)
When folding shirts/pants/shorts/etc. group by colors that you enjoy most in that season and move other seasonal favorite colors (like for fall for example) towards the back if you don’t plan to wear them anytime soon
Bonus Tips:
Pay attention to items in your wardrobe you can wear through several seasons. These pieces should be easy to see and access at all times. They deserve prime real estate in your closet and drawers since they create the foundation of a versatile, flexible wardrobe.
Dressing for Spring is all about transitioning between cooler + warmer temperatures, often within the same day. I love pairing a classic black pair of joggers with a blouse or top that feels like Spring. I’ll layer it with a sweater, a scarf or hat to stay warm as needed. Above: One of my favorite lavender thifted tops I purchased from Third Sister Thrift.
4. Get creative + resourceful with what you have.
Instead of running out to buy new pieces this Spring, I want to challenge you to utilize the clothing and accessories you already have. Here’s my top tips for extending your wardrobe and reinventing what you have so it feels fresh and new (for free)!
Dress in layers - while the weather is likely still shifting from cooler temps to warmer, you can take a typical Fall/Winter top and add a “Spring friendly” cardigan, blazer or scarf to change the entire look while still staying warm (I love dresses or skirts layered with sweaters/sweatshirts to stay warm while there’s still a chill outside)
Utilize accessories - scarves, jewelry, hats, headbands, shoes, nail/lip color can all take a Winter look and completely transform it to feeling lighter and fresher for warmer weather
Shop your favorite stores for ideas - without buy anything, peruse the aisles or online collections for what’s new for spring and see what aligns with what you already have in your closet; I also like to check out the seasonal thrifted ideas from thredUP that are usually at the top of their homepage
Bonus Tips:
Friendly reminder that you NEVER have to follow trends you see in the fashion world. Choose what you love and what you feel good in. Pay attention to what colors, prints and patterns you always gravitate towards and weave those in all year long with slight tweaks for the season as it makes sense for you/seasonal temperatures.
5. Plan + play with what you have.
One evening when you have a little time, pull out a few favorite staples in your wardrobe (for Spring or those classic anytime pieces you love - think a favorite t-shirt and favorite pair of joggers). Lay these pieces out on your bed and then pull out a few different layers /accessories to change up this look for different temperatures/styles depending on where you live/your daily life. Also consider how you can dress this combination up or dress it down. Challenge yourself to come up with at least 5 ways to make it feel like 5 different outfits. I did something similar to this last Fall with 10ish different combinations with the same few pieces. You can try out this same concept for Spring. Check it out here on Instagram.
Bonus Tips:
Consider taking pictures/document your ideas while you brainstorm different outfit combinations. You can organize your closet around these ideas or simply keep a “Spring Outfits” photo folder on your phone. You can do something similar with looks you find on Pinterest and keep a photo/idea log there. Have a friend over to help or hop on facetime to share ideas while you brainstorm new clothing combinations for the next season. Your friend might even have a piece or two they no longer wear that you do a swap for to refresh both of your Spring wardrobes!
Once you’ve moved through this process in the small bits of time you have, you’ll better clarify how you want to dress, be more in touch with the pieces you already have in your wardrobe, and you’ll better utilize the closet and drawer space you have. By taking a short time to brainstorm clothing combinations you’ll take the guesswork out of it later on, saving you time/mental bandwidth. Wins all around!
Want more support decluttering your clothing closet/wardrobe for Spring + beyond?
Clothing Closet Declutter Guide
See all Declutter Tools + Guides
Let me know how I can support you in your home.
Drop your comments below. Thanks for being here!
How To Do A Spring Declutter On Kids Toys
The dust has settled on the new year and we’ve all moved into a new routines. By now you know a bit more about the things that walked in the door at the end of last year. Some are being enjoyed and others are just creating unnecessary clutter and work for you. Since we are right on the cusp of Spring (even if the weather doesn’t quite feel like it where you are) this is the perfect time to reset your home from the toy clutter that’s accumulated since the new year. Here’s 3 steps to help you do a solid decluttering on your kids toys as we move into Spring (or anytime)!
Toys can mean anything your kids are playing and engaging with. Cast the net as wide or as narrow as you’d like to declutter.
1. Observe what they’re playing with.
This includes anything you consider “toys” in your home or fosters play, problem solving and creating. Think sports equipment, outdoor toys, bath toys, books, building sets, random “treasures”, rock collections, crafting supplies, stuffies, games, etc. I bet off the top of your head you’ll be able to identify several things you haven’t see your kids touch in months (if not longer) or have outgrown. In this phase of Spring toy decluttering, we’re merely taking note of what you’re seeing going on in your home to help you in the next step.
Bonus Tips:
To confirm your suspicions about what your kids are or aren’t playing with, ask them about what their favorites are (if age appropriate). Talk to your kids about things you never see them use and discuss whether to keep it or not. Move things around to draw more attention to items you suspect they enjoy but might have forgotten about because of where they are stored (out of sight). Use this as a benchmark for which items to keep while you’re observing what they’re naturally gravitating towards.
2. Do a thorough edit involving your kids.
You can tackle this in a few different ways. One, by a single category at a time. For example, edit all books, all building toys, all bouncy balls, all board games, dress up items, etc. Individual categories help you focus on one group of things at a time. Two, you can also edit by zone in your home. Toys in the bedroom, the primary play area, the toy chest, etc. Focusing on a certain zone in your home allows you to start and complete one area before moving on to another. However you want to do this is the right way to do it for you. In both of these options, you can break down the process into small chunks, as you can get to it with your schedule. Your kids will also stay more focused for a Spring decluttering on toys in small bursts of time. Correct, no clearing your schedule for a toy edit! Ain’t nobody got time for that!
Bonus Tips:
Involve your kids in whatever what you are able and feel comfortable. Age will steer conversations and the level of involvement. Take this decluttering time with your kids to ask questions, to listen and learn about what they’re enjoying most at this time. It is a time of connection and learning together. Ask what they enjoy most out of a group of book OR which are your favorite books you love reading over and over again? Ask directly “which items do you no longer enjoy?” Involve them in the donation, recycling, and giveaway process. Talk about what is trash versus something you can repair and keep. These are all just jumping off points on how to start. You know your child best and I know you’ll come up with some great ideas on decluttering together that is age appropriate. If you’re child is too young to involve, focus on toys they’ve outgrown, are developmental appropriate, safety and what activities you want encourage. Avoid toys that do all the work for your kids - focus on keeping toys that can be reinvented over and over again into different things depending on how they want to play in that moment.
One thing that has always been important in our home is to make drawing, art and creating accessible. We intentionally keep paper and drawing supplies out on one end of our table at all times and it gets used every single day!
3. Make it easy for play to happen.
After you’ve completed your Spring toy decluttering on any and all of the toys and play/create things, assess what you’ve decided to keep. Take a moment to make sure to set up clear zones for play to happen easily in your home. Not everything has to be out at one time, but items should be easily accessed by the kids as it makes sense for your space. Lesser used items can be tucked away, up high or in a spot adults can help with if it needs more supervision or more time to set up. Keep their favorites easy to access. If you want to encourage more reading or for that untouched bead set to be used, make it easy to see and reach for.
Bonus Tips:
During the Spring season, continue to take note of what they’re enjoying and what they’re outgrowing. Decluttering is an on-going process for all of us and this idea is highlighted the most with kids. They grow and change in the blink of an eye. Taking the time to filter what comes in, care for what is in the home, and being resourceful with what is kept is a must. When they’re asking for new things or to buy something with their piggy bank money, ask helpful questions to guide their decisions making like: where will this item go in the home, do you have anything like this already, how will you use this or play with it, how will you take of it, how much space will it take up and is that worth it to you, etc. While your child will still make the decision, these are questions they should learn to have in the mind before bringing new things into the home. Yes, it gets easier for you and them with practice!
NOTE: Adults need to comb through all these tools in our mind as well to help filter what we bring into the home. We model what we want to teach to our kids and decluttering is a powerful medium to share and learn with our kids over and over again.
A few organizing tips:
Once you’ve identified all your toy “keeps”, use this list as a go by when you’re finding homes for things + getting reorganized:
Try to store things where they will be used a much as possible, or where it would be the most convenient to access them
Make sure the main users (kids) can safely access things you want them to
Keep sometimes toys or items that need adult support away from the main play zones
Organize items by type and by size (building, books, kitchen toys, dress up, etc.)
Big items need a big shelf or bin / Smaller items need smaller containers to store them - when they get mixed is when you dig and lose things!
Not everything needs to be out at one time / consider rotating things around as needed / less out reduces overwhelm (where they choose nothing) and fosters more creativity
If you want to encourage more play with a particular thing, put in an obvious, easy to access space / move things around until you get the results you’re after
The size of your space or zone detemines how much you’ll have out. If something needs to be tucked away or pulled out, make sure it’s in an easy to reach spot so things don’t get forgotten/ignored.
Encourage easy clean up by making it simple and intuitive for your kids to do it on their own - but make sure to teach them what to do, what the expectations are and follow up!
The best “toy” you can offer your kids is open space to play, create, learn and breathe! Aim for less whenever possible.
Want more support decluttering all things kids?
Declutter Guide for Kids
See all Declutter Tools + Guides
Let me know how I can support you in your home.
Drop your comments below. Thanks for being here!
How To Start Your New Year: 3 Easy Tips To Simplify Your Life + Home
Truth time. I hate the pressure of starting the New Year off “right” and I’m a natural born goal setter and go-getter. There’s pressure to have goals, set intentions, do more, be more, do better. I’d like to take a counterintuitive approach in sharing 3 tips with you that will reduce your overwhelm day to day and simplify your life and home. We are setting no goals here, just offering ways to simplify your life. Deal? Ok, let’s get started.
Creating peace in my office niche has both to do with how the physical space looks/feels + with what’s lurking in my email inbox. Both need + deserve attention to be maintained.
1. Unsubscribe to Emails
Now I want you to be ruthless in this email unsubscribe purge effort for 10-15 minutes. The plan is to start unsubscribing from emails you don’t read or doesn’t add value to your life.
Make it happen: Look for marketing emails to stores you don’t shop at, emails you never signed up for (it happens), blog or email subscriptions to content that no longer interest you. Also consider changing the frequency setting to once a month to stores/shops you love but don’t want to hear from them as often.
Benefits: You’ll scroll less and have less emails to manage. By creating more boundaries in your email inbox, the more time you’ll save and the less overwhelmed you’ll be by your inbox.
Bonus tip: Do this a few times a year to keep your inbox wrangled (I like to do it at the change of a season since it’s easy to remember) . Deleting unwanted emails is a separate effort. If you struggle with this, schedule a reoccurring appointment on your calendar once a week for a short burst of concentrated effort to simplify your inbox.
Having the beds made in the kids’ room is crucial so the room doesn’t feel incredibly small as a shared space. When the beds are made, they tend to put their clothes away quicker and keep the room cleaner overall to maintain the fresh feeling they walked into. Since my kids are still young, this is often a joint effort and modeling this skill is the first step.
2. Make Your Bed Everyday
Don’t come at me like I’m a crazy person, OK? The benefits far outweigh the 2 minutes of bed-making, trust me.
Make it happen: Carve out 2 minutes in the morning, before you leave the house or dig into your workday, and make your bed. If you find that it is taking more than 2 minutes to make your bed, you need to do a bed audit. Remove all the unnecessary extras (excessive throw pillows or blankets) and keep only on the bed what is useful, beautiful and cozy.
Benefits: You set an invisible intention for the day that you value your space, your time and your home. Your room will instantly look more streamlined, spacious and cleaner. This clean visual cue (a made a bed) is a mood booster cue anytime you walk past or in your bedroom.
Bonus tip: One of my favorite ways to streamline and modernize the look of your bed (minus a big price tag) is to place a long lumbar pillow on top of your sleep pillows. It adds a moment of design, elevates the look of the bed, and is useful for your back if you like to sit up in bed and read at night.
3. Clear Off Your Kitchen Counters
I don’t care if you love to cook, don’t love to cook, have a large kitchen, have a tiny kitchen. I want you to take 5ish minutes before you turning in for the night to wrangle as much chaos in your kitchen so the next morning you don’t walk into an immediate to do list. Deal?
Make it happen: set a timer for 5ish minutes and hit the kitchen highlights. Put dishes away. Load the dishwasher. Clean things out of the sink. Put anything away sitting out on the counters that doesn’t need to be out. Wipe the counters down. Put things back where they belong.
Benefits: When you walk into your kitchen the next morning, it’s such a relief to walk into a fresh, clean space versus an immediate to-do list. Remember the saying “clear counters = a clear mind”? It’s a real thing. When there’s less visual clutter there’s less stress and overwhelm. Not to mention it will simplify your food prep throughout the day, saving you time and sanity.
Bonus tip: Create a predictable system/routine for washing dishes, whether it is handwashing or running the dishwasher. Know when it’s easier to run it and carve out a few minutes to put clean dishes away. I also want to encourage you to ditch your dish drying racks for good. They take up a ton of countertop space and encourage poor habits (like letting dishes just sit there without every being put away for days on end). Opt for a dish towel instead and hang it up after you put the clean dishes away. You’ll thank me later for all the extra counter space you’ll have back in your kitchen! You’re welcome!
When we take a few moments to simplify small bits in our day to day, the benefits continue long after. They also encourage us to value the spaces we have, what we own, and take better care of ourselves with just a few small shifts in our day.
I can’t wait to hear how these tips impact your entire day (please share below)!
If you have more in your home you’d like to simplify, check these handy tools in the shop:
Business + Life Simplifying Guide Clothing Closet Declutter Guide
Declutter Guide for Kids The Ultimate Kitchen + Pantry Guide
Let me know how I can support you in your home.
Drop your comments below. Thanks for being here!
5 Ways To Lighten Your Holiday Load
The holidays often come with unwanted pressure, stress, obligations eating up your time and that awful busy feeling we all hate. In an effort to go against the grain (as we like to do here), I’ve come up with some tried and true ways that will help lighten your load this holiday season, fill up your bucket and help you focus on what’s most important to you (minus the overwhelm and stress).
1. Unsubscribe From Unwanted Emails
Not where you thought I was going to start, am I right?!
Your inbox is about to be inundated with marketing emails and this is the perfect time to reduce what’s landing in your inbox. Within a few days and into the first week you’ll start noticing far less emails in your inbox to review, and less emails taking up your time.
WHAT TO DO:
put the timer on for 10 minutes
start unsubscribing from emails you no longer want to receive
delete emails you’ve already read + gathered what you needed from it
unsubscribe from stores/blogs/websites you never engaged with this year
2. Do A Quick Seasonal Declutter
I’m not talking about a huge entire home purge here, but editing things in a few key areas will feel like a full home declutter.
This is a great time to assess items that weren’t used, worn, not longer your taste or have expired. The change of seasons almost beckons for this, so let’s lean in! These three categories alone will have a far reaching effect on your day to day routines and how much you’re having to store/manage seasonally.
WHAT TO DO:
declutter seasonal decor as you pull it out to decorate your home (remove anything broken, you’ve fallen out of love it, have recently replaced, etc.).
declutter your cooler weather clothing/outerwear/accessories (if you never wear it, it doesn’t fit or beyond repair, send it on to donate or textile recycling)
declutter your fridge, freezer, pantry + spices (look for items you’re not eating or have expired) - donate anything unopened/not expired to your local food bank - have a list handy for writing down any items that need to be restocked
3. Look For Timer Savers
Many of you expressed to me that part of your biggest frustrations with the holiday season is feeling like you don’t have enough time for everything, therefore looking for ways to streamline your have-to tasks is a must.
Doing a quick time audit (where’s your time going each day) plus looking for ways to save time will help you get back in control of your days so you can enjoy what’s most important to you. Below are just a few examples that can be applied in many different ways.
WHAT TO DO:
write down things that are upcoming that are important to you that you want to make time this for this holiday season to put those into focus
identify things that can be done in advance or in bundled bursts to create more time for those important holiday activities/gatherings - this could be bundling cleaning or laundry tasks, scheduling a grocery order to save time or recruiting others to help with any of these basic but essential tasks
take care of shopping/errands during a low-traffic times on a weekday if you can, handle it all online or place an order for pick up for a convenient time
time saving example: I stock up on a few of my favorite appetizers that I can find in the frozen section for a few holiday occasions that save me lots of time (+ I like to pair with fresh fruits + veggies = is easy + fast)
time saving example: I love making fresh pie crusts but I often don’t have the steam for it so I spent time finding my favorite pre-made frozen brand as a back up that is delicious + preserves my energy for other things - I’ll stock up on several for pies, quiches + more!
4. Look For Things You Can Eliminate
Instead of saying yes to all the things, which we often feel compelled to do, try to looking for things that aren’t “have-tos” to let go of this season.
Saying no to things can be just as or more powerful than saying yes. And ironically, saying no to more things allows you to say yes to things that actually matter. Here’s a few ideas to help you recapture more time, energy + peace this holiday season.
WHAT TO DO:
eliminate any social gatherings that you don’t want to be a part of - no reasons are needed, promise!
eliminate the need to make all the food for an event - ask others to bring things, order food in advance or try a combo of making some + buying some already made to lighten your load
eliminate the pressure to buy new decor, a new outfit, or big gifts - repurpose what you have + gift with heart/intention - the size + cost doesn’t matter
eliminate the need/pressure to buy “things” to give to others - offer up your time, cook a meal, gift an experience, offer to fix something or do housework for someone or make something with your own two hands
eliminate the pressure for family photos, holiday cards, etc. if you’re heart is not in it this year, don’t do it - save your money + energy - take intentional time to connect with those you care about most when you can + call it a day (or year!)
5. Fill Up Your Bucket + Others
Lightening your load is very much intertwined with how you care for yourself + others.
In a season where the feeling of “busy” seems inevitable, let’s slow down + look for ways to do just the opposite. Here’s a few ideas to get you going.
WHAT TO DO:
donate to a favorite charity or new one in your area for a cause you’re wanting to support/impact this season
take some quiet walks to move your body, get some fresh air + clear your mind - or meet up with a friend to walk together
surprise a neighbor with a meal or homemade treats they might not be able to make for themselves
schedule in downtime and quiet alone time to rest your body + mind
take some leisurely power naps + read more
focus on local shops and small businesses for gifting and home good needs
incorporate a free family activity or fun with friends like driving around to see Christmas + holiday lights in your area on Friday nights until New Years
schedule a low key game night with family or friends + maybe throw in some hot chocolate, popcorn or store bought treat/keep it easy!
call, text or write a quick note of encouragement to friend/family member
purchase high priority items from an Amazon wish list for a local non-profit or charity - check their website or send them an email to inquire more
Get creative, start looking more intentionally and I promise you’ll find lots of ways to take your time + energy back while doing some good for yourself + others.
Wishing you all the happiest + healthiest of Holidays!
Thanks for being here + I’ll see you in the next post.
Dynamic Women In Their Home - Nicki
We’re in a year long series of interviews highlighting incredible women in our community. The focus of each interview is to have a candid conversation about their home, life, what they value, what feels challenging right now, and most importantly, what’s bringing them joy.
Our next interview is with Nicki Turner. Nicki is a one woman show over at Cori Rose Handmade where she creates lightweight clay jewelry. She’s based out of Polk County Florida, not too far from my sister, who’s also a Floridian. Nicki and I connected through mutual interest Instagram accounts many months ago. I landed on her page one day and loved what she was doing, as she was just starting up her handmade clay jewelry business at that time. I am most drawn to her use of color and I am a total sucker for her simple stud earrings (yes, she does big, bold pieces as well you’ll need to check out)! I also appreciate her ability design for the bold and minimal aesthetic simultaneously, which I feel is incredibly rare!
A while back, I did an “ask me anything” series and she reached out to me about advice on several kids sharing a bedroom and how to keep it organized (what a fabulous topic). You can see my response here on Instagram.
Most days you can find us DMing each other about our kids and encouraging each other on our small business adventures! I’ve loved watching her business grow, how she involves she kids in her making process, and seeing her keep pushing her creative boundaries through the designs in her shop. I’m absolutely thrilled to share more about her with you here!
Scroll down to enjoy my interview with Nicki about all things home and life.
Share a quick snapshot of your last 5 years:
Over the last five years I've have been transitioning roles from working full time, being in school, raising kids, and starting a new business.
What's your day to day like right now?
I drop my girls off at school in the morning and then return home to work.
While my girls are at school I'm making products and scheduling marketing events to promote my work. Throughout the week I also have webinars and meetings with virtual entrepreneur communities. My work day ends at 3 pm so that I can pick up my girls. Sometimes I leave projects from my business for after school so that they can join me. I love teaching them about clay and having their help.
How long have you been in your current home?
I've currently been in my home for almost four years. We were not looking to buy, but I walked through this house and fell in love. I saw the home online and it looked like an Austin Powers movie set. My friend was a realtor and was familiar with the neighborhood, so I asked her if I could be nosey and see the house. She warned me that it was a time capsule, but agreed. After my first walk though I fell in love and we started a long and grueling process of renovation (a story for another time). I'll never forget finishing our first walk through and my friend asking me what I thought. I told her I could see myself living there and my husband was like that was not the purpose of us visiting this house (lol).
Also, after purchasing this home we found out a lot of really cool history about the previous owners and their amazing contributions to our community.
What do you love most about your current home?
The size. It's very spacious and large, because the previous owners did a lot of entertaining.
What's something you'd love to change/or feels challenging for you in your current home?
There is still a lot that needs to be renovated, because we had to stay within a budget. Also, we have an insane amount of storage space all throughout the house and we don't utilize it well.
In the last year, have you spent any time decluttering/editing in your home (if so where/why)?
Here and there we have made efforts to declutter. Recently we've done some decluttering in our girls room, because we were inspired by advice from Kristin with Fuzzy Hippo Shop. She emphasized the importance of children's rooms being restful and gave a lot of insight on how to help kids with shared rooms have their own areas.
If you have spent time decluttering/editing, what was the result? Was it helpful?
Decluttering their room was extremely helpful. The girls are starting to prioritize making their room cozy and restful, by giving ideas on what to remove and add. They mostly want to add things (lol).
What part would you rather do - declutter OR organize (+ why)?
I'd much rather organize, because I have a hard time letting things go. I'm always worried I'm going to miss it, or that I should use it while I already have it. Haha, this probably means that I need to focus on decluttering rather than organizing.
Where's your favorite spot in your home right now?
I have a few, but my favorite is our dining room in the morning. Our home has a lot of windows and when the sun hits just right the rooms are golden, warm, and cozy.
What object in your home means a lot to you?
Our dining table. We built it with Ben's uncle and its taken a beating, but I love it. It can comfortably fit 10+ people.
Tell me something fun or quirky about you I probably don't know...
I played soccer from Kindergarten through college and I can play four instruments.
OK, NOW A FEW RAPID-FIRE HOME QUESTIONS!
Light/bright OR dark/moody:
I love both, but for my mental health I need Light/Bright
Open concept or separated rooms/nooks:
Open Concept
Color or neutrals:
Color
Real plants or faux:
Real Plants
Listen to music or read:
Listen to Music
Favorite morning or daily ritual:
Coffee or Tea in a quiet house
Morning person or night person:
Night Person
Favorite piece of furniture in your home:
Dining Room table or Piano
Do you dress like the interiors of your home?
No
THANK YOU NICKI for sharing more about your home and life with us! I love following along with your colorful designs and can’t wait to see what you’ll be creating next! Thank you for giving us a snapshot into this current season of life for you!
Photo Credit: Nicki Turner
Cori Rose Handmade Clay Jewelry | https://www.corirose.com/
Follow Nicki over on IG: @corirosehandmade
See you in the next interview!
Ready to make things feel easier + simpler in your home?
✔ Learn the 3 step process to start simplifying your home now + regain more time/energy.
✔ Shop all Declutter/Organize/Design Guides + Programs here.
✔ Shop all desk/home/kitchen organizing helper in the Paper Shop.
✔ Skip to the head of the line + work with me to fast track the changes to make life lighter + easier in your home now.
HAVE YOU GRABBED YOUR FREE DECLUTTERING FREEBIE YET?
Learn 10 Not So Obvious Things To Declutter Now To Start Living Lighter.
5 Steps to Simplify Your Kitchen + Pantry Now
A recent poll from our community shouted out loud that this topic was something that MOST everyone needed ASAP! Deal! We’ll break down together some simple steps to get your understanding your kitchen and pantry on a deep level so you can start removing obstacles lingering around and start making life easier here!
And PS. when your kitchen is working right, a lot of other things seems to go SO much smoother throughout your home and your day!
1. Observe Your Space
All we’re doing in this first step is looking around and taking note of any hot spots you see or are experiencing. A hot spot might look like:
cluttered counters or piles of things on the counter
overstuffed shelves or cabinets
digging for things or not being able to find things easily
lots of extra trips to the store
finding expired things you’re not getting to because you didn’t know you had it
lots of duplicates of things you don’t actually use
seeing things taking up space that you don’t use, enjoy or like anymore
your family not being able to take care of their basic needs in the kitchen without your help (based on their age of course)
areas that are hard to keep clean or organized
I want you to write it ALL down. Any observations and anything you know you’re currently struggling with related to anything kitchen and pantry.
2. Remove Things
Now we are going to select a zone of your kitchen and pantry to focus on improving. Let’s pretend you’re really struggling with a particular drawer in your kitchen (lots of digging going on and overstuffed). We’re going to focus on that zone/category only for the next several steps. Deal?
The next step is to heavily EDIT (declutter) this zone so it can intentionally serve the purpose you need to serve. Pull everything out from this zone so you can objectively look at what is there outside of it’s current “home” that you’re conditioned to looking at at certain way (and numb to).
Here’s what you’re looking for to edit out:
items you never use
items that are broken/damaged/beyond repair
duplicates that aren’t used regularly
items you don’t like/enjoy anymore
items that don’t belong in this zone and need to be relocated
Toss items that cannot be donated or repaired. Recycle if possible based on your local regulations (I was just able to recycle old plastic plates and dishware that were not in good enough shape for donation by could be recycled locally). Donate if it’s in good shape and can be resold/be immediately useful to someone else. Donate it locally or offer it up to a site like Free Cycle in your community.
3. Move Things
Before you put things back into this zone, you are going to assess what you’ve decided to keep and align that will how you want that zone to work.
Back to my example of the overstuffed kitchen drawer, here’s what I am going to think about now that this zone is emptied and edited:
what is the drawer close to/what tasks will it make easier for me? (ex. cooking/baking prep)
what tasks do I want to do right near this zone and what should be in this drawer to support this? (ex. chop, mix, stir, measure)
When you more clearly identify what this zone (drawer for example) needs to do, it will likely involve you moving things around to get the end result you’re after and simplify/create more efficiency in this zone.
Now you’re going to group what you are keeping in this zone (drawer for example). Use these guidelines to group items in a zone:
by size/ shape (items with fit better together, nest better and maximize your space)
by use (spatulas together, measuring tools together, long spoons together, etc.)
by frequency of use (if you use it all the time, move it to the front so it’s super easy to grab)
4. Add Order
With clear categories of items to put back in the zone you’re focusing on, a bit of additional order (organization) will make this zone shine with efficiency and make great use of the space you have.
Here’s some ideas for how to maximize any zone in your kitchen and pantry with organizational items you likely already have in your home:
counter tops - if it must stay out, make sure it is used frequently, isn’t taking up too much usable counter space (corral essentials on the counter with a tray, plate or shallow basket)
shelves - keep what is used frequently in the front and easily in reach, if out in view all the time, curate items by type to create visual “collections” by use, color, material, size, etc.
cabinets - to avoid losing items deep in the cabinets, use baskets, containers or bins with handles/cut out to pull out a group of items (like water bottles or cooking tools) all at once and can easily slide back in place similar to a drawer
drawers - create mini drawers with drawer dividers, shallow boxes, cut down cardboard boxes, lids, trays, etc. Subdividing the space you have allows you to see all that you have at a glance and make it easier to access what you need without digging around
5. Live With It
With all your essential keep items back in their place in this kitchen and pantry zone, it is now time to LIVE with the changes you’ve made. As you spend more time with this newly refreshed area, you might realize it is exactly as you need it to be OR that it needs a few tweaks.
Here’s what you might experience and how to tweak it:
you notice you don’t need something out on the counter anymore (your habits/routine has shifted) and can be tucked away
you need to move something to another spot in your kitchen/pantry to make it easier to access/use or support a task better
you need another mini zone in a drawer or cabinet to make it easier to access something
you want to swap locations of items for another area of your kitchen/pantry because it makes more sense
Tweaking things to get them working just right is a normal part of the process as you “listen” to your space and respond to what is needed to make life easier and more efficient in this area.
Want more support in your kitchen + pantry?
If you’d like understand how to make your kitchen + pantry work seamlessly, efficienctly, look beautiful, while saving you time, money and energy, I’d love for you to check out my Ultimate Kitchen + Pantry Guide.
If you’re current kitchen feels too small, has too little storage, you think you need to spend a ton of money on it to improve it or take on a costly renovation, the clutter and chaos feels like it is never ending, then this program is calling your name!!
Can’t wait to blow your mind as I show you exactly how to intentionally declutter, organize and layer in design you love throughout your current so you fall back in love with your kitchen again!
Thanks for being here + I’ll see you in the next post!
Dynamic Women In Their Home - Molly
We’re in a year long series of interviews highlighting incredible women in our community. The focus of each interview is to have a candid conversation about their home, life, what they value, what feels challenging right now, and most importantly, what is bringing them joy.
Our next interview is with Molly Lam. Molly and I were destined to meet for many years because we were swirling around in the same handmade/makers community in the DFW area.
We’re in a year long series of interviews highlighting incredible women in our community. The focus of each interview is to have a candid conversation about their home, life, what they value, what feels challenging right now, and most importantly, what’s bringing them joy.
Our next interview is with Molly Lam. Molly and I were destined to meet for many years because we were swirling around in the same handmade/makers community in the DFW area. When I met her in the fall of 2016, I had come off of an incredibly taxing year of family health issues, followed by having a miscarriage of my own, all in the midst of studying for one of my Interior Design Professional exams. To say that meeting Molly as a fellow designer/maker at the Etsy Dallas Jingle Bash/Handmade Bash was a *bright spot* for me that year would be a total understatement! She stopped by my booth of paper goods and said the most sincere, kind things about my shop and my booth display. We hit it off, both encouraged and inspired by the design work we were both doing at the time, while also having young children about the same age. We’ve thankfully stayed in touch ever since and I continue to be inspired endlessly by the creative, color and dynamic work of hers over in her design shop, Tokodots. Since that show, her illustrations have evolved to various mediums, from prints, to cards, to fabric designs and surfacing art. She also has a card of the month subscription delivered to you monthly so you can keep a stash of beautifully colorful cards on hand for notes through out the year. Yes please!
Most days you can find Molly and I chatting about our kids, random house decluttering/organizing bursts, and how we’re navigating motherhood along side being a small business owner. I am so grateful to have her here to share with you!
Scroll down to enjoy my interview with Molly about all things home and life.
Photo Credit: Yony Lee Kim @ylkphotography
Share a quick snapshot of your last 5 years:
The last 5 years have been a whirlwind of the early years of motherhood as a SAHM to my two young boys, building and running a small stationery and art business.
What's your day to day like right now?
It’s the end of the school year (at the time of writing this) so things are crazy, breakfast and rushing to school in the mornings, usually followed by a little down time at home with my toddler after that. We spend time in the garden, making art, doing housework and sometimes just sitting on the couch to watch TV while I work on a project before naptime, then school pickup and the dinner/evening activity rush. By the time the kids are finally settled down some time around 8:00pm I find it really hard to make good use of that alone time! I like to just go to bed early if I can stay off of my phone, but a lot of days lately I’m up late trying to get in some time on creative projects.
How long have you been in your current home?
My husband and I moved into our one story, 3B house in the suburbs about 6 years ago before our oldest had his first birthday. Because of the timing of our move with a little one I let so many design decisions go for years and years and am still working through some ideas about how I actually want things to look.
What do you love most about your current home?
We have a “small” home by Texas standards, but I love that I can have eyes on both of my kids from the kitchen while I prepare meals in any of the areas they’d be playing in our house. When we were searching, we definitely had the kids in mind as we decided what was a priority for us at this stage, even if it’s not really what we ultimately love in a home.
We’ve also been really flexible about how we organize the space, and some rooms have seen many different layouts and setups for the kids as they have gone through different stages of childhood. We’ve eaten dinner at our dining room table about 3 times since we’ve lived here, and the rest of the time the room has been used as a “family work room” which has meant sewing spot, painting studio, Lego zone, puzzle area, or even cello practice area over the years. We’ve moved the table around the room in different ways, had a couch in there for a short time to accommodate a big tent in the living room, and cordoned the whole area off with a baby fence for a big portion of the pandemic. Our master bedroom, off the main living area, now has a big bookshelf, all of the art supplies, and several work tables for the kids because it is a convenient space we could lock off for the little one but I could still see and supervise from my spot in the kitchen. It’s not exactly the most relaxing bedroom setup for me, but we like that everyone has a variety of spaces to use throughout our home and that feels worth it for the sacrifice when the kids are small.
What's something you'd love to change/or feels challenging for you in your current home?
I never thought I’d buy a house with half-circle windows and really wanted something more interesting but here we are in the North Texas suburbs with lots of things I swore we’d never have. I have had a hard time expressing my own style in a home that is not really what I had envisioned for our family, but little by little we’re making it our own. We started by painting everything white, the walls and the kitchen cabinets, and try to use that as a base for the colorful textiles and artwork that we’d like to use in the space. The house has these small cutout shelf/nooks in some hallway spaces that really bothered me at first, but I’m finally figuring out how to use them in a way that I like.
In the last year, have you spent any time decluttering/editing in your home (if so where/why)?
Yes! It is a constant struggle, because I have a tendency to always be stashing things out of the kids’ sight—toys they are being too rough with, special items I want to have up my sleeve for when they need a surprise, or just things of my own that I don’t want out for everyone to see—and this often means stuffing things quickly into a locked cabinet, tall shelf, high counter, or off-limits closet and then not having the energy to clear it out when the kids are asleep. My guest room/studio closet, a few junk-type cabinets in the kitchen, and my desk are all places that I spend decluttering more often than I’d like, but as the kids get bigger I can find a little time and mental space to address these things, more than I used to at least.
If you have spent time decluttering/editing, what was the result? Was it helpful?
It always feels so great to declutter and get rid of things I don’t need but I’m obviously not doing it enough because there are certain problem spots that just need to be addressed again and again. Although each time I do a big purge—baby toys we’ve outgrown, maternity clothes I’m not saving anymore, and other unnecessary items, I’m getting closer to the simplified home I prefer.
What part would you rather do - declutter OR organize (+ why)?
I think I’d rather declutter.. I’ve spent years reorganizing things that were really just too big for their spaces. And now that I’ve realized the great feeling of leaving some spaces empty, I just want to clear out everything!
Where's your favorite spot in your home right now?
I love this hutch in our dining room/family work room. It had more of my own books and display objects on it until recently, when I had to make room for some growing book and Lego collections. But I love how my cookbooks can live alongside Lego manuals and everyone has their own space on this special piece.
What object in your home means a lot to you?
My favorite things are my quilts—mostly made by my mom but a few by me too. I wanted to find the right place to store them where I could enjoy looking at them all the time, so we settled on this console table in an angled spot leading into our family room. I love it because I can see them as I walk by (when the kids don’t have them draped all around the living room), but I also like that if I ever had to run out of the house in a fire I could probably grab an armful to bring them with me.
Tell me something fun or quirky about you I probably don't know...
I’m not an animal person. When I first moved to Japan after college I had a blog called “Afraid of Small Animals” inspired by my fear of the creepy crawlies that I figured would show up in my new apartment. Now that I have kids of my own I work really hard to show how excited I am to meet neighborhood pets so that my kids don’t end up scared too. But it might be in their blood.
OK, NOW A FEW RAPID-FIRE HOME QUESTIONS!
Light/bright OR dark/moody:
Light/bright
Open concept or separated rooms/nooks:
Open concept
Color or neutrals:
Color!
Real plants or faux:
Real.. if I can keep them alive
Listen to music or read:
Read
Favorite morning or daily ritual:
That first cup of coffee
Morning person or night person:
Morning
Favorite piece of furniture in your home:
My little Muji couch, the first piece of furniture I bought as an adult in 2005 in Japan and have found a spot for ever since. It’s faded and a little worse for the wear but still hanging in. I’d love to reupholster it in a bright, colorful pattern when the kids get a bit bigger. Maybe of my own design!
Do you dress like the interiors of your home?
Sometimes! Neutrals as a base for bright colors and interesting textiles… but I want to do a better job of mixing color and texture in my wardrobe. It’s a work in progress.
THANK YOU MOLLY for sharing more about your home and life with us! I love following along with your colorful life and designs and can’t wait to see what you’ll be creating next! Thank you for giving us a snapshot into this current season of life for you!
Photo Credit: Molly Lam | http://www.tokodots.com/
Portrait Photo Credit: Yony Lee Kim @ylkphotography
See Molly’s Shop on Etsy: https://www.etsy.com/shop/tokodots
Find Molly on IG: @tokodots
See you in the next interview!
Ready to make things feel easier + simpler in your home?
✔ Learn the 3 step process to start simplifying your home now + regain more time/energy.
✔ Shop all Declutter/Organize/Design Guides + Programs here.
✔ Shop all desk/home/kitchen organizing helper in the Paper Shop.
✔ Skip to the head of the line + work with me to fast track the changes to make life lighter + easier in your home now.
HAVE YOU GRABBED YOUR FREE DECLUTTERING FREEBIE YET?
Learn 10 Not So Obvious Things To Declutter Now To Start Living Lighter.
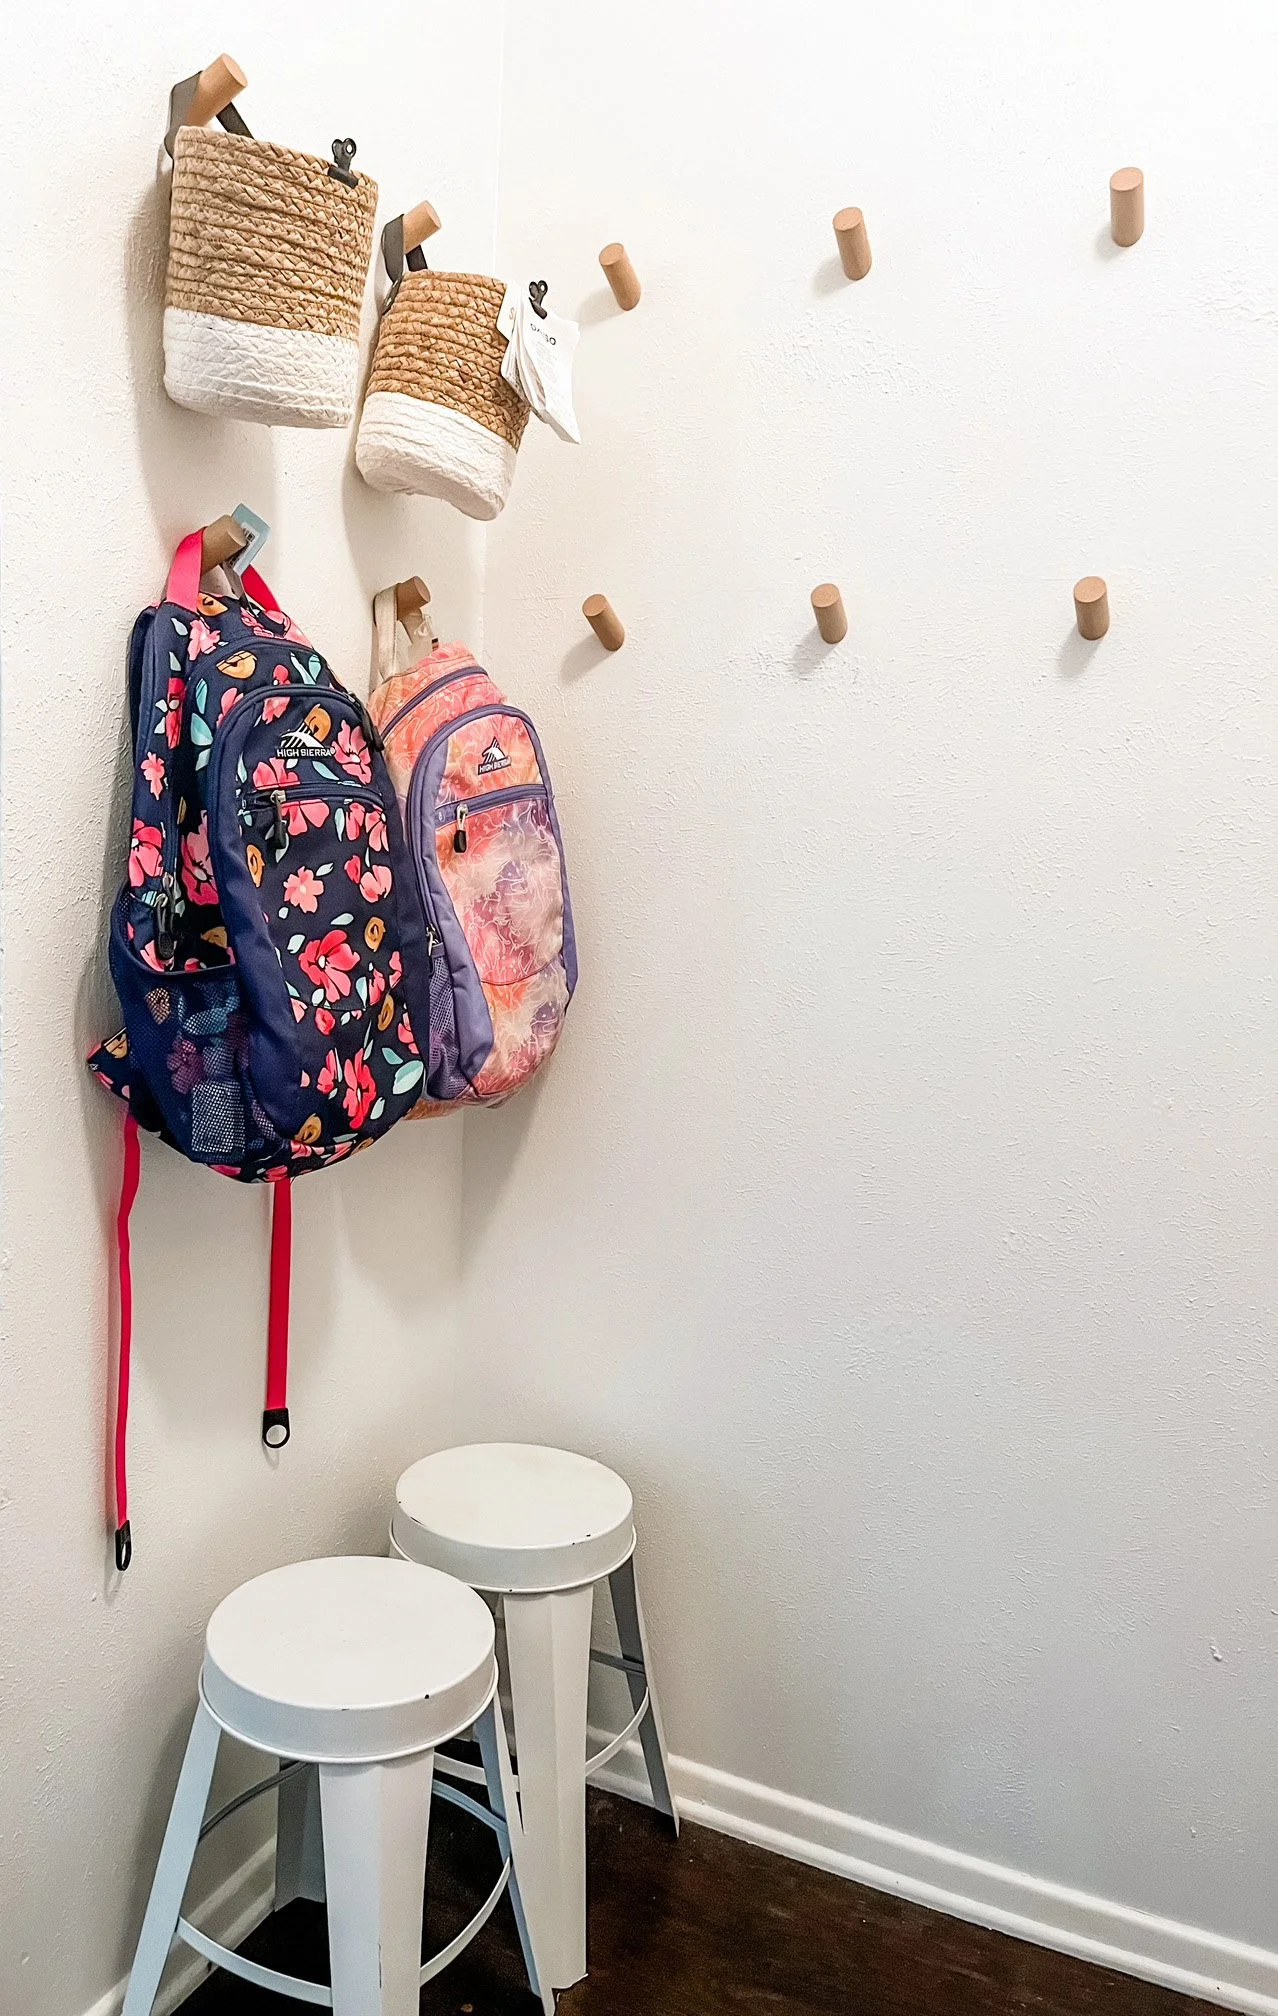
3 Steps to Improve Your Entryway Today: Back To School Edition
If I got paid for every time someone popped into my DMs about their entryway being a fluid concept, I’d FOR SURE be more financially stable in my small business!
For those of you who have hung out with me for a minute, you know that our entryway (where our front door is) also doubles as my kids’ main play area. Now while you may think I’m on something, I’ll assure you every square inch is intentional for everyone using the space and everything has a home. I also have to note that this spot happens to be more of a secondary entryway for us currently.
Our pass thru from the kitchen to the laundry/pantry/garage is what we use most and MUST be a well oiled machine or it’s a one way pass to the hot mess express. Another less significant in and out point of our home is near the door to our backyard, but more on that spot another day! You can read more on our garage pass thru entry/exit spot in our home and streamlining your morning routine a recent blog post here.
Your primary entryway in your home is a workhorse, however it is set up. It does, however, often get ignored because of the hustle and bustle of the daily grind. How often have you noticed something in your entryway as you were leaving and thought “geez, it would be nice if ____ was different?” Only to go on with your life and only think about it again the second you are back in that spot. Sound familiar?
Well today we’re going to learn how to break this cycle of confusion and chaos in your entryway once and for all with tools/strategies that will stand the test of time. Deal?
Here’s 3 steps to improving your entryway that I know you can do in a snap so you can get back to all the living!
1. Observe, audit + edit.
For the sake of this exercise, I want you to identify the primary entryway or in and out point in your home. This doesn’t necessary have to mean your front door.
Next I want you to simply observe what is going on in this space. Look at it with fresh eyes like you’re a visitor to the space. Who uses it? What do they need there? What clutter chaos is hanging out there? What doesn’t need to be there? Are there other functions going on in here (this is where we also do laundry and unpack groceries)?
Now I want you to do a thorough, RUTHLESS edit of this space. If it is not going to support the actions that must happen in this space, relocate it, donate it, recycle it, send it packing. Only allow things to stay that will actively support your in and out routine in your home. Again, I want you to be ruthless, OK?!
PS. Do not feel discouraged for a second looking at my laundry room/mudroom photo up there…it has been RUTHLESSLY edited and organize over the years (this is also my job!) and I can assure you that this photo makes this space appear far larger than it is in real life!
2. Create essential zones.
With your primary entryway newly edited, it’s now time to create clear zones for your essentials. Remember, your essentials are the things you MUST have for your entryway to work well, improve efficiency and streamline every action you’re doing. Try to limit any “extras” in this space and only focus on what you need to make life EASY moving in and out of your home.
Some examples zones might be: shoe storage, bag or backpack storage, seasonal clothing storage, reminders board, extra baskets or bins for store returns or library books, etc. Create whatever zones you need to make your space efficiency for all the users of the space.
We’ve spent time streamlining/editing your entryway, and now it’s time to possibly bring things in to make your space work even better. Do you need more hooks for backpacks? Do you need a smaller basket for shoe storage to encourage less options to be stored there? Do you need a place to sit to put shoes on? Do you need a pen visible to sign papers for school? Think through each step, each detail and each need and keep asking the question…”how can I make this easier”?
A few quick considerations from your resident Interior Designer here and efficiency chasers:
Remember who is using each item and consider the height or reach range of each user so they can easily use hooks, shelves, baskets, etc. If they can’t reach it, they won’t use it and chaos will continue.
Consider the weight and durability required for things like wall mounted hooks or storage shelves. Install these items in studs in your home wherever possible. Verify weight capacities on any product you install for safety and so you know how much you can store where.
Focus on durability and aesthetics while selecting items to finish streamlining your space. If you select pieces that won’t last, you’re wasting your money and material resources. Shoes shouldn’t be stored in white soft bins for obvious reasons. Consider items that can be easily vacuumed out or wiped down. Also, make sure you actually like each item you bring into this space. You will be looking at it everyday, several times a day. It will impact your mood and it’s worth the attention to get it just right.
Bonus points - select items that you could use in other areas of your home in the future! This is how the “shop your home” concept continues to come full circle with intentional buying!
3. Live with it + make changes.
There is an unfortunate misconception that once we get a space set up that it’s done for good. Sometimes we do get really close and don’t have to touch it for a while. True. But is that realistic for anything, to expect it to never change or evolve over time? Does anything in life stay exactly the same? No. I want to encourage you to have the mindset with any area of your home that somethings might need to be tweaked and a few things changed here and there. Not only is this necessary but this mindset is aligned with real life.
At this present moment, I want you to live with the changes you have just made. Give them a few test runs. Check in with all your users and see how it works for them? Were they able to put everything back where you showed them things belong? Did you need one more bin or need to remove one that is not being used? Do you need one more hook in a different location than you thought? Do your keys need to be stored in a completely different spot? Make a few intention tweaks if needed and then get back to living.
Inevitably seasons change, needs change, kids get taller, schedules shift, etc. Do a check in during the first few days of your improved space, then only sparingly after that when you detect a bit of extra chaos. No problem. Simple run through these three steps again and you’ll be good to go!
Product ideas if you need them (but please shop your home first as always)!
Galvanized Metal Planter (or maybe a shoe tray - check the depths with the shoes you want to store first)
Galvanized Boot Tray (would great for kids + adult shoes/larger boots for rain/winter situations)
Dog Food Tray Mats ( to give a minimal durable/physical boundary for shoes, lay a wet umbrella on or hang to drip on)
Yamazaki Home Shoe Rack (I love most of their designs + like that it is more vertical solution for several pairs of shoes)
Minimal Wood Wall Hooks (you can create all sorts of designs with these or simply keep them in a row - they look like art when not in use!)
Pegrail Hook Rack (these are essential in our home + are helpful for bags, backpacks, jackets, seasonal gear + more)
White Wire Baskets with Wood Handles (durable extra storage and things to remember heading out the door with a boundary that looks good)
More Resources!
Watch my Instagram live with one of my favorites @thefreckledkey where we chat more about the challenges in her mudroom/entryway in her home and some ideas from both of us for how to navigate them. It can be incredibly helpful hearing how someone else is using their entryway area in their home and the roadblocks they’re dealing with (which just might happen to look similar to what’s going on in your home). You can do this!
Thanks for being here + I’ll see you in the next post!
More Support for Your Home + Life:
✔ Lots more decluttering + organizing support here to lighten the load in your home!
✔ Ready to take action in your home? START HERE with with FREE Home Simplifying Quick Guide!
✔ Not sure where to being + need help getting started? Check out the tools I’ve created for you HERE.
3 Things To Simplify Your Morning Routine For Less Stress: Back To School Edition
Well friends, it is August and back to school plus the general shift out of summer mode is upon us, and with that comes the resurgence of morning chaos (if we let it)!
The phenomenon of morning chaos comes from two things. One, things taking too many steps to complete. And two, things being done that don’t actually need to be done at that time. But I have GREAT news! We have control over both of these things, and when we streamline our morning, it also allows for more flexibility to handle those unpredictable moments that tend to pop up conveniently at this time (like spills, a forgotten scrunchie, or a missing favorite shoe).
Whether your kids are headed back to school, you homeschool, you’re starting a new job or just wanting to tame your regular morning chaos during the week before you start your day, I’m here to help. Let’s not waste another second!
1. Clarify what’s essential for your morning.
You’re no longer going to walk blindly into your mornings or let them just happen to you, deal? You’re also not going to shove a bunch of stuff into your morning that won’t add value to you, your family or your day. When I say clarify, that’s exactly what I mean. I want you to go through this list below and ask yourself (honestly) what needs to be part of your morning (and for everyone involved) to make it great (and of course less chaotic). We’re going to do a morning time/activity audit if you will!
Before you add or allow something into your morning routine, first ask yourself:
Will this add fuel to my tank (or to others) to start the day?
Does it absolutely have to be done in the morning before work/school/etc?
Could it be done at another time and still be helpful/effective?
Do I even need to do it at all? (domestic chores, can lunch packing happen at night or the process be simplified or delegated)
Make sure whatever you have loaded up into your morning routine during the week are things that HAVE to happen in the morning to get your day started off on the right foot. Edit out everything else from your morning that doesn’t need to happen then and watch the chaos melt away!
2. Edit your “exit” zone.
You can also consider this your landing area for bags/daily essentials OR the place you grab all the things you need before you head off to school, work, etc. If you’re schooling from home, take some time to edit your learning hub/learning command center so your transition into your learning time is smoother and easier. Our exit zone in our laundry niche, which also happens to be the pass thru between our kitchen, pantry and garage. There is a lot of activity happen in one small area so it must be a well-oiled machine or it quickly turns into the hot mess express.
Here’s a few things to consider while you edit your space:
Does each item in this space support what needs to happen here?
What can I remove from this space to make grabbing our essentials for the day easier/quicker?
It is clear what each person should do here, is clearly marked, or highly intuitive so it is easy to do?
Do I have everything I need here or do I need to add anything to streamline how this space works? (more hooks, labels, rearrange a few items)
Have I given this space some breathing room (some white space) so it’s not chocked full of stuff and more flexible for us to move in and out of?
Does everyone in the home understand where everything is, what to do in here and what the realistic expectations are?
After you edit your space, give it a test run to make sure you’ve covered all the details. Walk everyone through how to use the space and let them ask questions and share feedback/share their insight to make improvements. Make tweaks as needed once you start getting in you groove during a normal week day. We learn and improve things only by living with it and by reflecting on how well it is working.
3. Carve out time to fuel + care for yourself.
Remember to do this what actually help you save time and energy over the course of your whole day, boost your mood and increase your patience/flexibility to handle whatever the day might through at you. This looks different for each person, but as the adult in the home, you need to invest time each day in yourself to care for your well-being, even in small ways right out of the gate as you start your day.
Here’s a few ideas to get your going:
Having a quality but simple/quick breakfast.
Filling your favorite water bottle up the night before to save time in the morning.
Quiet time to stretch before you join your family to start the day.
Packing a protein snack for later in the day.
Having fresh flowers out on the counter you see the most during your morning routine.
Reading a few pages in your book instead of screen scrolling.
Avoiding checking emails first thing in the morning.
Sipping your favorite coffee or tea while you get breakfast ready.
Delegating some tasks to free up a few extra minutes so you can spend more time caring for yourself.
Getting up a few minutes earlier so you can move slower while getting dressed for the day.
Listen to your favorite music or an inspiring podcast while you get ready.
Going to bed 20 minutes (or more) so you can feel more refreshed when you wake up in the morning.
Tidy up the kitchen, your bedroom or your exit zone the night before so the first thing you see in the morning is order and peace.
Test these 3 simplifying strategies in your home now to reduce the stress and chaos you feel in your morning. And remember to check back in with these whenever you feel the chaos on creeping up again…you just might need to implement a few simple tweaks to get your routine back on track!
See you in the next post!
BIG HUGS,
Kristin
More Support for Your Home + Life:
✔ Lots more decluttering + organizing support here to lighten the load in your home!
✔ Ready to take action in your home? START HERE with with FREE Home Simplifying Quick Guide!
✔ Not sure where to being + need help getting started? Check out the tools I’ve created for you HERE.
Dynamic Women In Their Home - Lauren
We’re in a year long series of interviews highlighting incredible women in our community. The focus of each interview is to have a candid conversation about their home, life, what they value, what feels challenging right now, and most importantly, what is bringing them joy.
Our next interview is with Lauren Nygard. Another one of my favorite humans I’m so thrilled to introduce you to in our incredible community here.
We’re in a year long series of interviews highlighting incredible women in our community. The focus of each interview is to have a candid conversation about their home, life, what they value, what feels challenging right now, and most importantly, what is bringing them joy.
Our next interview is with Lauren Nygard. Another one of my favorite humans I’m so thrilled to introduce you to in our incredible community here. Lauren and I met at Texas A&M in Architecture School (we were both studying Environmental Design during our undergrad years). I’m trying to pinpoint exactly when we met, but I am guessing it was at least by sophomore year. We were in the same student group that studied abroad in Barcelona, Spain and we’ve stayed connected ever since. After we both went in different directions for graduate school, we stayed connected by sending each other mix CDs…Lauren, should we start this up again? I loved this! Lauren is a former military spouse and mom of 2 young boys who wears many business hats that I’ll let her tell you more about. She’s an incredible photographer (you can find her work here) and is a major learn through reading advocate. Yes, she’s my go-to book lady! Most days you can find us DMing about misc home biz, iced coffee hacks + kiddo randomness. She has the most lovely, infectious laugh and is passionate about creating and sharing good out in the world. I’m so thrilled to share more with you about her here!
Scroll down to enjoy my interview with Lauren about all things home and life.
Photo credit: Lauren Nygard
Share a quick snapshot of your last 5 years:
In the past 5 years, we've added two boys to our family, my husband got out of the military, we moved from NC to TX, and I've been working from home during a pandemic. :)
What's your day to day like right now?
We spend a lot of time in our backyard or reading on the couch. I squeeze in work when I can during the day, and usually work for an hour or two after the boys go to bed.
Photo credit: Lauren Nygard
How long have you been in your current home?
Since September 2019, though it seems like just a few months!
What do you love most about your current home?
It's cozy and the perfect size for our family.
What's something you'd love to change/or feels challenging for you in your current home?
This is a huge can of worms! We had to have our foundation repaired last summer and are still waiting for our flooring material to arrive so that we can replace the flooring (it was damaged due to foundation issues). We then will need to repair cracks in our drywall (walls and ceilings) and repaint practically every surface.
Beyond that mess, our boys' bathroom doesn't function well as is (I've messaged you about our towel storage in there!) and I'm considering replacing the vanity while we're redoing the floor. The vanity that was installed before we moved in is above average height, which I actually love but it doesn't work well for our 18-month-old. The bathroom is so small that we can't put a step stool tall enough in front of the vanity without blocking the entrance to the bathroom (the door opens up to the sink). Now that he's interested in potty learning, it's been even more frustrating than it had been.
Photo credit: Lauren Nygard
In the last year, have you spent any time decluttering/editing in your home (if so where/why)?
Yes! Lots of editing of my closet and dresser drawers, as well as my "work" and "craft" stashes. When our second son arrived, my office became his room, and my work desk moved out into our living room. When he's a little older, he'll move into the same room as our older son (and we'll get an office again--hurray!) but I cleaned out a lot to make the shift happen--and it's still a work in progress!
If you have spent time decluttering/editing, what was the result? Was it helpful?
It has been super helpful to be able to find more of what we need and get rid of things we no longer need or use. There are still some areas that need more decluttering (our laundry room cabinets have become a stash for random stuff) but we've been working on it little by little.
What part would you rather do - declutter OR organize (+ why)?
Right now, definitely declutter... because organizing doesn't matter if you still have too much stuff.
Photo credit: Lauren Nygard
Where's your favorite spot in your home right now?
Inside.... Our bedroom! We spend most of our time in our living room but the 4 of us end up hanging out, lounging and reading on our bed sometimes. The living room tends to get out of control with toys so our bedroom is a nice place for us to relax since it's usually cleaner. (Except when I don't put my laundry away--shhhhhh!)
Outside... We have a really deep front porch that was a total sanity saver when we were homebound in 2020. Colt and I spent lots of time out on the porch, even through the heat of summer (pregnant!)--we were gifted an old art table from a neighbor, and he'd scribble for hours out there. We added a big deck in our backyard about a year ago, which has been amazing as well.
Photo credit: Lauren Nygard